

If you’ve ever struggled with screws that are too tight or too loose, understanding how to use a cordless drill clutch can change everything. This simple feature on your drill gives you control and precision, saving you time and frustration.
Imagine finishing your project without stripped screws or damaged materials. You’ll learn exactly how to adjust and use the clutch to get perfect results every time. Keep reading, and you’ll master a skill that makes every drilling task easier and more efficient.
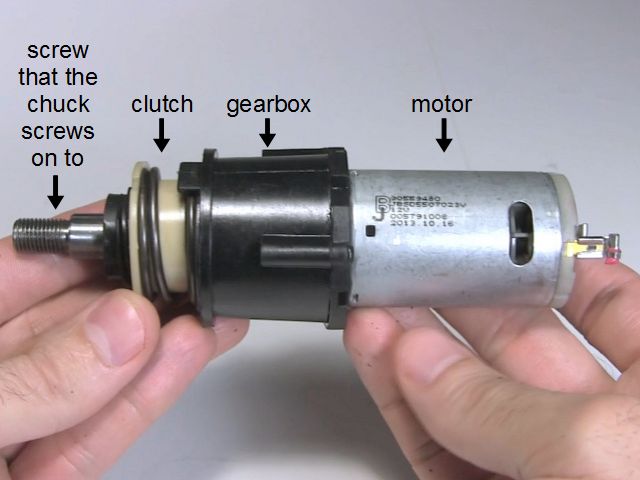
Credit: rimstar.org
Cordless Drill Clutch Basics
The cordless drill clutch is an important part of your drill. It helps control the power the drill uses. Knowing the basics of the clutch makes your work easier and safer.
This section covers what a cordless drill clutch does and its main parts. Understanding these will help you use your drill better.
Purpose Of The Clutch
The clutch stops the drill from turning too much. It prevents screws from breaking or going too deep. It protects the drill motor from damage. It helps control the speed and torque. This makes drilling more precise and safe.
Key Components
The clutch has several main parts. The gear ring adjusts the torque level. The spring controls the pressure on gears. The cam locks or releases the drill’s rotation. These parts work together to control the drill’s force.

Credit: www.youtube.com
Adjusting Clutch Settings
Adjusting the clutch settings on a cordless drill is important. It controls how much power the drill uses. This helps prevent damage to screws and materials. Setting the clutch right improves your work and keeps tools safe.
Selecting The Right Torque
Torque means the drill’s turning force. Choose a low torque for small screws or soft wood. Use higher torque for large screws or hard materials. Start with a low setting. Increase the torque step by step until it works well.
When To Increase Or Decrease
Increase torque if the drill stops before the screw is fully in. Decrease torque if screws strip or break. Lower torque also helps when working with delicate materials. Adjust settings to match each job for the best results.
Techniques For Precision
Techniques for precision with a cordless drill clutch help you control the power. They prevent overdriving screws or damaging materials. Using the clutch correctly saves time and improves your work quality.
Focus on adjusting the torque to match the task. Start with low torque and increase as needed. This approach gives better control and avoids mistakes.
Starting With Low Torque
Set the clutch to a low torque setting first. This reduces the drill’s twisting force at the start. It helps avoid stripping screws or cracking wood. Low torque is ideal for delicate tasks and soft materials.
Begin drilling slowly. Check how the screw goes in. If it moves easily, keep the torque low. This protects your work surface and keeps screws tight.
Gradual Torque Adjustment
Increase torque little by little if the screw doesn’t go in well. Turn the clutch dial up one step at a time. This gives better control over the drill’s power. It also stops screws from spinning too deep.
Adjust torque based on material hardness and screw size. Harder materials need more torque. Softer materials need less. Test the torque on scrap material if unsure.
Common Mistakes To Avoid
Using a cordless drill clutch correctly helps prevent damage and makes your work easier. Avoiding common mistakes improves the drill’s performance and extends its life. Understanding what not to do saves time and keeps your projects on track.
Over-tightening Screws
Turning the drill clutch too tight can break screws or damage materials. Excess force makes screws strip or snap. It wastes effort and may ruin your work surface. Set the clutch to the right level for the job. Let the drill stop automatically to avoid over-tightening.
Ignoring Clutch Calibration
Not adjusting the clutch for different tasks causes poor results. Each material needs a different clutch setting. Soft wood needs less torque than metal. Calibrating the clutch ensures screws go in smoothly without damage. Check and adjust the clutch before starting any new project.
Maintenance Tips
Keeping your cordless drill clutch in good shape helps it work longer and better. Regular care prevents problems and saves money on repairs. Simple steps keep the clutch smooth and ready for any job.
Cleaning The Clutch Mechanism
Dirt and dust can clog the clutch parts. Use a soft brush or compressed air to clean these areas. Avoid water or harsh chemicals that can cause rust. Clean the clutch after every few uses to keep it working well.
Regular Inspection
Check the clutch for wear and damage often. Look for cracks, loose parts, or strange sounds during use. Tighten any loose screws and replace worn parts quickly. Regular checks help catch small issues before they become big problems.
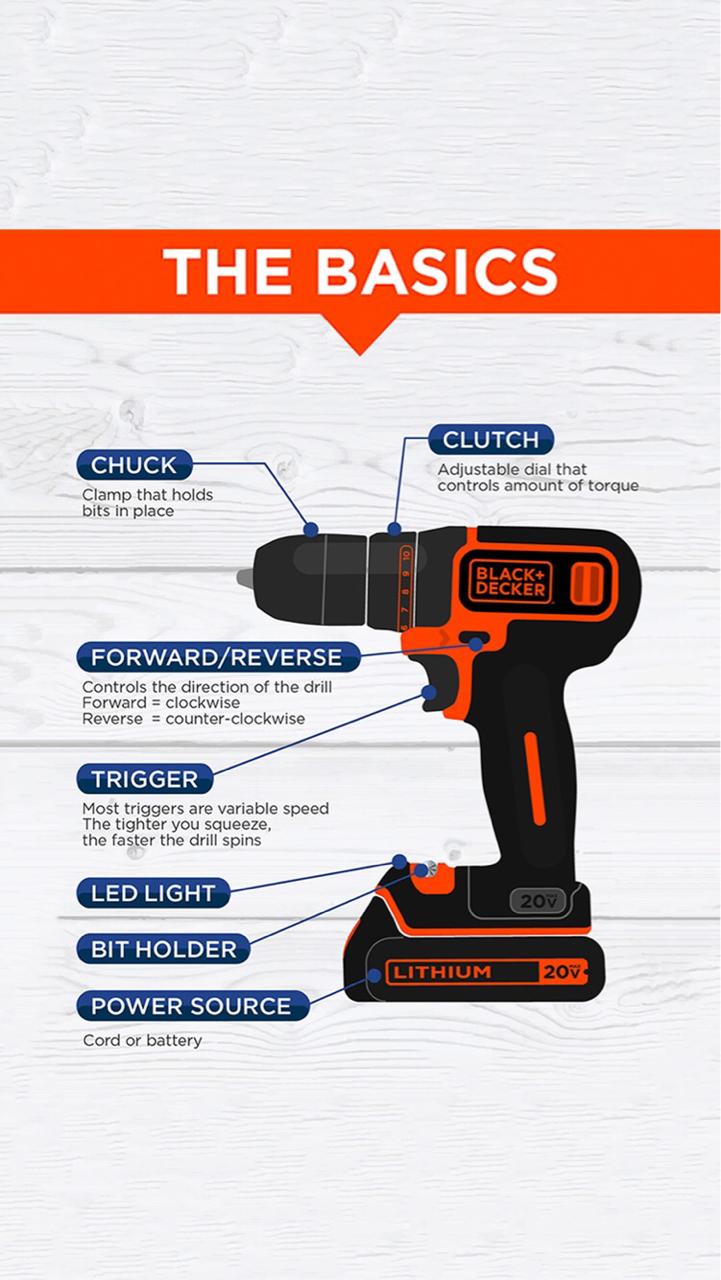
Credit: support.blackanddecker.com
Practical Applications
Understanding how to use a cordless drill clutch can make many tasks easier and safer. The clutch controls the drill’s torque, preventing overdriving screws or damaging materials. It helps match the power to the job, saving time and effort. Below are some practical ways to use the clutch in daily projects.
Woodworking Projects
Set the clutch low to avoid splitting wood. It stops the drill once the screw is tight. This protects delicate surfaces. Use a higher clutch setting for harder woods. It gives more power for deep screws. The clutch helps create clean, precise joints in furniture or shelves.
Metalworking Tasks
Metal requires careful torque control. The clutch prevents slipping and stripping screws. Adjust it to a medium-high setting for metal sheets or frames. This ensures steady pressure without damage. The clutch also helps avoid overheating drill bits during long jobs.
Home Repairs
Home repairs often involve different materials. The clutch lets you switch settings quickly. Use low settings for drywall or plaster to avoid holes. Higher settings work well for wood or metal fixtures. The clutch protects your walls and fasteners from excess force.
Frequently Asked Questions
What Is The Purpose Of A Cordless Drill Clutch?
A cordless drill clutch controls torque output to prevent overdriving screws. It protects materials and drill bits from damage. Adjusting the clutch lets you match torque to specific tasks, ensuring precision and safety during drilling or driving.
How Do I Adjust The Clutch On A Cordless Drill?
To adjust the clutch, rotate the clutch collar near the drill chuck. Higher numbers increase torque, while lower numbers reduce it. Choose a setting based on your material and screw size to avoid stripping or breaking screws.
When Should I Use The Clutch On My Cordless Drill?
Use the clutch when driving screws into wood, drywall, or soft materials. It prevents over-tightening and damage. The clutch is essential for precision work, especially when working with delicate surfaces or small fasteners.
Can Using The Clutch Extend Drill Battery Life?
Yes, using the clutch reduces unnecessary torque, lowering battery strain. It prevents the drill from working harder than needed, saving energy. Proper clutch use leads to longer battery life and more efficient drilling sessions.
Conclusion
Using a cordless drill clutch helps you control the torque easily. It protects screws and materials from damage during work. Adjust the clutch to match the task for better results. Practice with different settings to understand how it works. This simple tool makes drilling safer and more efficient.
Keep your drill clutch clean and well-maintained for long use. With these tips, your projects will go smoother and faster. Try it yourself and see the difference it makes.