

Are you planning to remove old tiles and wondering if a Ryobi hammer drill can make the job easier? You’re in the right place.
Using a hammer drill on tile removal might sound tricky, but with the right steps, you can save time and effort. This guide will show you how to use your Ryobi hammer drill safely and effectively to get those stubborn tiles off without damaging your walls or floors.
Keep reading, and you’ll soon have the confidence to tackle your tile removal project like a pro.

Credit: yao.com.do
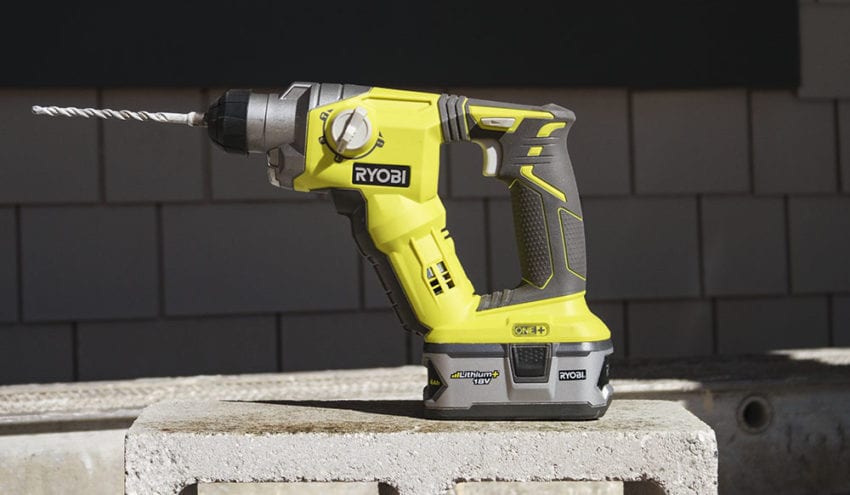
Choosing The Right Ryobi Hammer Drill
Choosing the right Ryobi hammer drill is important for tile removal. The tool must be strong and easy to control. Picking the correct model helps you work faster and safer. Not all hammer drills fit tile removal tasks well. Knowing what features to check saves time and effort. Let’s explore key features and some good Ryobi models for tile removal.
Key Features To Look For
Power is the first feature to consider. A drill with high impact energy breaks tiles quickly. Look for models with adjustable speed settings. This lets you control the drill for different tile types. A comfortable grip reduces hand fatigue. A lightweight design helps you work longer without strain. Check for a variable speed trigger for better control. Durable construction ensures the drill lasts through tough jobs. An easy-to-change chuck is useful for swapping bits fast. Also, a hammer drill mode is needed for breaking tiles effectively.
Recommended Models For Tile Removal
The Ryobi P214 is a popular choice. It offers good power and variable speed control. The compact design makes it easy to handle on tiles. Another option is the Ryobi P259. This model has strong impact power and a hammer mode. It suits heavy tile removal tasks well. The Ryobi P261 also works great. It is lightweight and has adjustable speed settings. Each of these models balances power and comfort. They help make tile removal simpler and quicker.
Preparing For Tile Removal
Preparing for tile removal is an important step before using a Ryobi hammer drill. Proper preparation helps protect you and your home. It also makes the work easier and faster. Taking time to get ready will save effort later.
Safety Gear Essentials
Wear safety goggles to protect your eyes from flying debris. Use a dust mask to avoid breathing dust particles. Gloves protect your hands from sharp tile edges. Wear ear protection to reduce noise from the hammer drill. Use sturdy shoes to avoid injuries from dropped tools or tiles.
Work Area Setup
Clear the room of furniture and other items. Cover floors and surfaces nearby with a drop cloth. Tape plastic sheets over vents to stop dust spread. Make sure the room has good lighting. Keep a first aid kit nearby for any minor injuries.
Gathering Necessary Tools
Besides the Ryobi hammer drill, you need a chisel bit for tile removal. Have a hammer for stubborn tiles. Keep a bucket or container for broken tile pieces. Use a putty knife to scrape leftover adhesive. Prepare a broom and dustpan for clean-up after work.
Setting Up The Ryobi Hammer Drill
Setting up the Ryobi hammer drill properly is key to safe and effective tile removal. Taking time to prepare the drill ensures better control and less damage. Follow simple steps to get your tool ready for the job.
Selecting The Correct Drill Bit
Choose a drill bit made for tile or masonry. Carbide-tipped bits work best for hard surfaces. Avoid using bits meant for wood or metal. The right bit reduces cracking and speeds up removal. Check the bit size to fit your drill chuck tightly. A loose bit can slip and cause accidents.
Adjusting Speed And Mode Settings
Set the drill to hammer mode for tile removal. This setting combines rotation with a pounding action. Start with a low speed to control the drill easily. Increase speed only if needed. High speed may cause tiles to break unexpectedly. Use a steady hand and steady pressure for best results.
Credit: jenwoodhouse.com
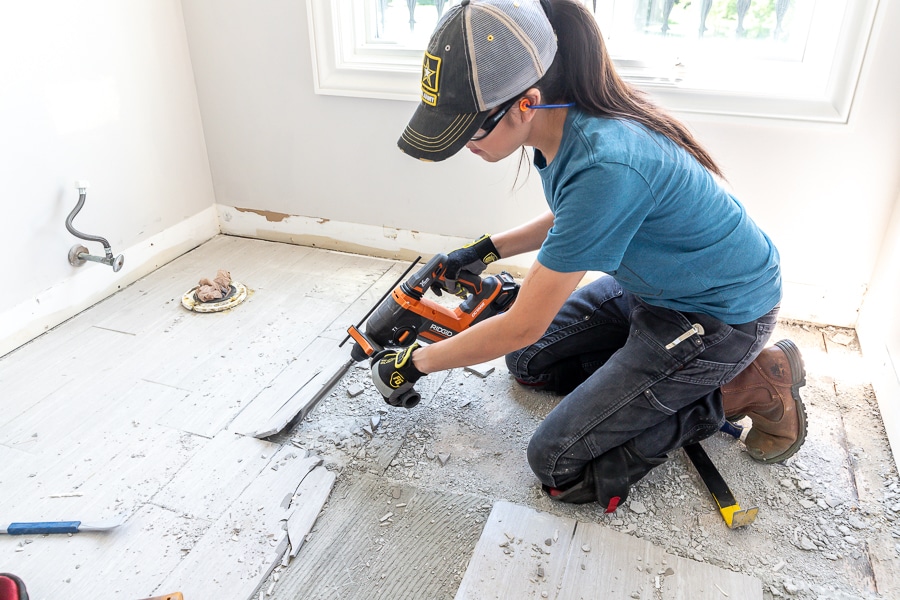
Techniques For Efficient Tile Removal
Removing tiles can be tough without the right method. Using a Ryobi hammer drill makes the job easier and faster. Proper techniques help remove tiles cleanly and protect the surface underneath. This section guides you through simple steps for efficient tile removal.
Starting The Removal Process
Begin by clearing the area around the tile. Put on safety glasses and gloves for protection. Fit the hammer drill with a chisel bit. Hold the drill firmly and position the bit at the tile edge. Start drilling slowly to loosen the tile without breaking it.
Applying Proper Pressure
Press the drill with steady, even force. Too much pressure can crack the tile or damage the tool. Too little pressure slows the work and wastes energy. Let the drill do the work. Keep your grip stable to control the movement.
Avoiding Damage To Substrate
Watch for signs that the tile is coming off. Stop drilling when the tile starts to lift. Use a flat tool to gently pry the tile away. Avoid digging into the surface below. Protect the substrate for easy installation of new tiles.
Handling Common Challenges
Removing tile with a Ryobi hammer drill can be tough. Challenges often arise that slow down progress and cause frustration. Handling these common issues helps finish the job faster and safer. Below are tips to manage some frequent problems during tile removal.
Dealing With Stubborn Tiles
Some tiles stick tightly to the surface. Use steady, firm pressure but avoid forcing the drill. Let the hammer drill’s power loosen the tile bit by bit. Work around the edges first to break the seal. Patience prevents damage to the wall or floor underneath.
Managing Dust And Debris
Tile removal creates a lot of dust and small pieces. Wear a mask and safety glasses to protect yourself. Use a vacuum or dust extractor near the drill to keep the area clean. Clear debris often to keep the workspace safe and stop the drill from clogging.
Preventing Tool Overheating
Continuous drilling heats the Ryobi hammer drill quickly. Pause regularly to let the tool cool down. Avoid pressing too hard, which strains the motor. Keep vents clear and remove dust from the tool. Cooling the drill helps it last longer and work better.
Post-removal Cleanup
After removing tiles with your Ryobi hammer drill, cleaning up is important. The area will have leftover adhesive and broken tile pieces. Proper cleanup makes your space safe and ready for the next steps. Follow these simple tips for an easy cleanup process.
Removing Residual Adhesive
Adhesive left on the surface can cause problems later. Use a scraper or putty knife to gently remove the glue. For tough spots, apply a bit of warm water to soften the adhesive. Work slowly to avoid damaging the surface underneath. Clean the area with a damp cloth to remove any residue.
Disposing Of Tile Debris Safely
Tile pieces can be sharp and dangerous. Wear gloves to protect your hands while handling debris. Collect all tile fragments in a strong trash bag. Seal the bag tightly to prevent cuts or accidents. Check local rules for disposing construction waste properly. Keeping the area clean helps avoid injuries and keeps your home tidy.
Maintenance Tips For Ryobi Hammer Drill
Maintaining your Ryobi hammer drill is key for long-lasting performance. Proper care helps the tool work smoothly during tile removal tasks. It also reduces the risk of breakdowns and costly repairs.
Simple maintenance steps keep your drill reliable and safe. Regular cleaning and inspection are essential parts of this process. These tasks only take a few minutes but make a big difference.
Cleaning After Use
Remove dust and debris from the drill after each use. Use a dry cloth to wipe the exterior surfaces. Avoid using water or harsh chemicals that could damage the tool.
Clean the ventilation slots carefully to prevent clogging. Use a small brush or compressed air for this. Keeping these areas clear helps the motor stay cool.
Remove the drill bit and clean it separately. This prevents buildup that could affect performance. Store the tool in a dry place to avoid rust.
Regular Inspection And Care
Check the drill for loose screws or parts regularly. Tighten any loose components with the right tools. Inspect the power cord for cuts or damage. Replace damaged cords immediately to avoid hazards.
Test the trigger and switch to ensure they work smoothly. Listen for unusual noises during operation. Strange sounds may indicate internal issues needing repair.
Lubricate moving parts as recommended in the user manual. This reduces friction and wear on components. Keep your Ryobi hammer drill in top shape with these simple checks.
Credit: www.sietesetenta.com.ar
Frequently Asked Questions
How Do I Use A Ryobi Hammer Drill For Tile Removal?
To use a Ryobi hammer drill for tile removal, fit a chisel bit, set the drill to hammer mode, and gently chip away tiles. Wear safety gear and work slowly to avoid damaging the substrate.
Can A Ryobi Hammer Drill Damage Underlying Surfaces?
Yes, improper use of a Ryobi hammer drill can damage surfaces beneath tiles. Use low power, correct bits, and steady pressure to protect the substrate during tile removal.
What Safety Precautions Should I Take When Removing Tiles?
Always wear safety goggles, gloves, and a dust mask. Ensure the area is well-ventilated, and unplug the drill when changing bits to avoid accidents.
Is A Ryobi Hammer Drill Effective On All Tile Types?
Ryobi hammer drills work well on ceramic and porcelain tiles but may struggle with very hard or thick stone tiles. Use appropriate bits for best results.
Conclusion
Using a Ryobi hammer drill makes tile removal easier and faster. Take your time and work carefully to avoid damage. Always wear safety gear for protection. The right drill bit helps to break tiles smoothly. Clean up debris often to see your progress clearly.
Practice a bit before starting on tough spots. This tool can save effort if used correctly. Keep these tips in mind, and your tile removal will go well. Simple steps lead to good results.