

Are you tired of struggling to drill perfect holes at tricky angles? Using an angle drill guide can change the way you work, making your projects smoother and more precise.
Imagine cutting down your mistakes and saving time every time you pick up your drill. You’ll discover simple steps to use an angle drill guide like a pro, even if you’re a beginner. Keep reading, and you’ll unlock the secret to cleaner, more accurate drilling that will make your work stand out.

Credit: www.youtube.com
Benefits Of An Angle Drill Guide
An angle drill guide makes drilling tasks easier and more precise. It helps control the drill’s angle and direction. Using this tool improves the quality of your work. It also reduces mistakes and saves effort. Many people find it useful for both small and big projects.
Improving Drilling Accuracy
An angle drill guide keeps the drill steady and aligned. It stops the drill bit from slipping or moving off target. This ensures holes are drilled exactly where needed. The guide helps maintain a consistent angle for all holes. Accurate drilling leads to stronger joints and better finishes.
Enhancing Safety
Using an angle drill guide reduces the risk of accidents. It keeps your hands away from the drill bit. The tool controls the drill’s movement, preventing sudden slips. This lowers the chance of injury or damage. Safety is important, especially for beginners or in tight spaces.
Saving Time And Effort
An angle drill guide speeds up the drilling process. It removes the need to measure and adjust angles repeatedly. This tool reduces trial and error, saving time. Less effort is needed to hold and control the drill. You can finish your projects faster and with less stress.
Choosing The Right Angle Drill Guide
Choosing the right angle drill guide is key for safe and accurate drilling. The right guide makes your work easier and more precise. Not all guides fit every job or drill type. You must know what to check before buying or using one.
Types Of Angle Drill Guides
Angle drill guides come in different styles. Some have fixed angles, like 90 degrees, for common tasks. Others offer adjustable angles for more flexibility. Compact guides fit tight spaces better. Some guides include laser pointers for better accuracy. Pick a type based on the kind of projects you do.
Material And Build Quality
Strong materials mean longer-lasting guides. Look for metal or high-quality plastic parts. Metal guides resist wear and tear better. Plastic guides can be lighter but less durable. Check the joints and screws. They should feel tight and stable. A sturdy guide keeps your drill steady and safe.
Compatibility With Drill Models
Not all guides fit every drill. Check the guide’s chuck size and drill type. Some guides work only with cordless drills. Others fit corded drills or both. Make sure the guide fits your drill’s size. The wrong fit can cause slips or damage. Always match the guide to your drill model.
Preparing For Drilling
Preparing for drilling is an important step. It helps ensure accuracy and safety. Taking time to prepare will make your work easier and better.
Selecting The Correct Drill Bit
Choose a drill bit that fits your project needs. Match the bit size to the hole size required. Use a bit designed for the material you will drill. This prevents damage to the workpiece and the bit.
Marking The Drilling Spot
Mark the exact spot where you want to drill. Use a pencil or marker for clear visibility. A center punch can create a small dent to guide the bit. This stops the drill from slipping during use.
Securing The Workpiece
Hold the workpiece firmly in place before drilling. Use clamps or a vise to secure it well. This keeps the material steady and prevents accidents. Always check if the piece is stable before starting.

Credit: www.oskooltools.com
Setting Up The Angle Drill Guide
Setting up the angle drill guide correctly is key for accurate drilling. It ensures the drill bit stays steady and drills at the right angle. This section explains how to prepare your angle drill guide in simple steps.
Attaching The Guide To The Drill
Start by placing the guide on the drill’s body. Tighten the screws or clamps to hold it firmly. Make sure it does not move or slip during use. A secure fit helps keep the drill steady.
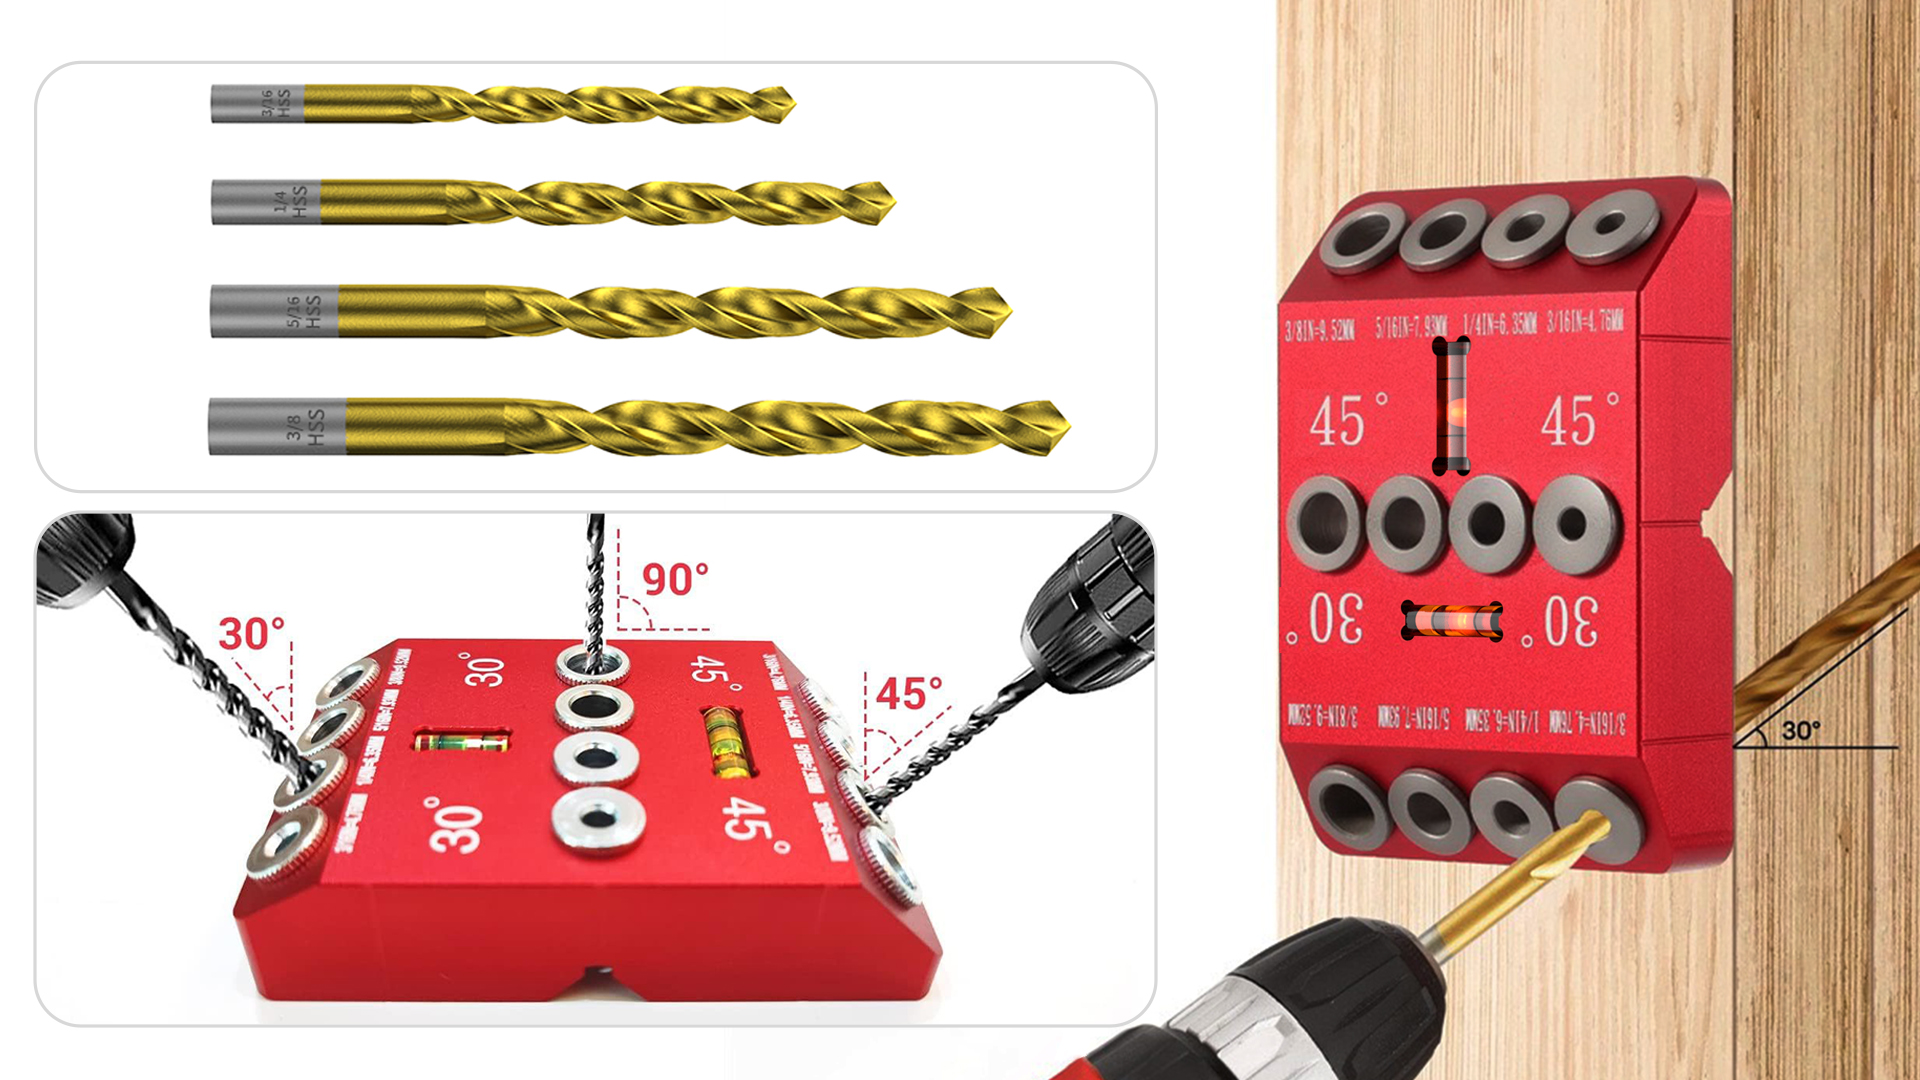
Adjusting The Angle Settings
Set the desired angle on the guide’s scale. Most guides have markings for common angles like 30, 45, or 90 degrees. Turn the adjustment knob until the pointer matches your angle. Double-check to avoid mistakes.
Aligning The Guide With The Marked Spot
Place the drill bit tip exactly on the marked spot. Hold the guide flat against the work surface. Adjust the guide’s position until the drill is straight over the mark. This step ensures the hole is drilled in the right place.
Techniques For Precision Drilling
Precision drilling is key to making clean and accurate holes. Using an angle drill guide helps keep the drill steady and aligned. Knowing the right techniques improves your results and protects your workpiece.
Focus on drill speed, pressure, and starting with pilot holes. These steps help you drill perfectly every time.
Maintaining Proper Drill Speed
Keep the drill speed steady and not too fast. High speed can overheat the drill bit and damage the material. Slow speeds work best for hard materials like metal. For wood, medium speed is usually enough. Adjust speed based on the material type and drill bit size.
Applying Even Pressure
Push the drill with steady, even pressure. Too much force can break the bit or cause the drill to slip. Too little pressure makes the drill bit slip or burn. Let the drill bit do the work. Steady pressure helps maintain control and accuracy.
Using Pilot Holes For Accuracy
Start with a small pilot hole before drilling the full size. Pilot holes guide the larger drill bit and reduce slipping. They also help keep the hole straight and clean. Mark the spot clearly before drilling the pilot hole. This step makes the final hole more precise.
Common Mistakes To Avoid
Using an angle drill guide can improve your drilling accuracy. Avoiding common mistakes helps you work safely and efficiently. These errors often cause poor results or damage. Pay close attention to these points before you start drilling.
Incorrect Angle Adjustment
Setting the wrong angle on the guide leads to crooked holes. Always check the angle twice before drilling. Use a protractor or the guide’s markings for accuracy. Small angle errors affect the final fit of screws or bolts.
Loose Guide Attachment
Fastening the guide loosely causes it to move during use. This shifts the drill bit and ruins the hole. Tighten all screws and clamps firmly before starting. A secure guide keeps your drill steady and precise.
Ignoring Safety Precautions
Skipping safety steps can cause injuries or damage tools. Wear safety goggles to protect your eyes from debris. Keep hands clear of the drill bit and moving parts. Make sure your workspace is clean and well-lit.
Maintenance And Care Tips
Maintaining your angle drill guide helps it last longer and work better. Simple care steps keep the guide safe from damage. Proper upkeep ensures accurate drilling every time. Follow these tips to protect your tool.
Cleaning The Guide After Use
Remove dust and debris from the guide after each use. Use a soft brush or cloth to clean tight spots. Avoid water or harsh chemicals that can cause rust. Clean parts help the guide move smoothly and stay accurate.
Regular Inspection For Wear
Check the guide regularly for signs of wear or damage. Look for cracks, loose screws, or bent parts. Replace any worn components quickly to avoid problems. Regular checks keep your guide reliable and safe to use.
Proper Storage Practices
Store the angle drill guide in a dry, cool place. Keep it in a protective case or toolbox to avoid dust. Avoid leaving it in damp areas to prevent rust. Good storage keeps the guide ready for your next project.
Advanced Tips For Expert Users
Advanced users can greatly improve their drilling work by using the angle drill guide in smart ways. This tool offers precision and control, but combining it with other tools takes results further. Adjusting angles for tricky projects helps achieve exact outcomes. Knowing how to fix common problems keeps work smooth and efficient.
Combining With Other Tools
Pair the angle drill guide with clamps to hold materials steady. Use a ruler or square for extra alignment accuracy. Combining these tools reduces mistakes and saves time. A workbench with a vise can also improve stability during drilling. This setup makes drilling safer and more precise.
Customizing Angles For Complex Projects
Adjust the angle drill guide to fit unusual shapes or tight spaces. Mark the exact angle needed before starting. Use a protractor or angle finder to set the guide correctly. Small angle changes can make a big difference in results. Practice on scrap material to confirm the angle is right.
Troubleshooting Drilling Issues
Check if the drill bit is sharp and clean for smooth drilling. Inspect the angle guide for loose parts that cause wobbling. Make sure the material is firmly clamped to avoid slipping. If holes are off-center, recalibrate the guide or adjust your angle. Keep tools maintained to prevent common drilling problems.
Credit: stonedesignbysantos.com
Frequently Asked Questions
What Is An Angle Drill Guide Used For?
An angle drill guide helps drill holes at precise angles. It improves accuracy and control, especially in tight or awkward spaces. This tool is ideal for woodworking, metalworking, or DIY projects requiring exact drilling.
How Do I Attach An Angle Drill Guide?
Attach the guide by securing it to your drill’s chuck. Ensure it is firmly tightened for stability. Adjust the guide to the desired angle before drilling for precise hole placement.
Can Angle Drill Guides Improve Drilling Accuracy?
Yes, angle drill guides significantly enhance drilling accuracy. They maintain consistent angles, reducing errors and uneven holes. This results in professional-quality work and saves time on corrections.
What Materials Can I Drill With An Angle Guide?
You can drill wood, metal, plastic, and composite materials. The guide provides stable support regardless of the material type. Always use the correct drill bit for the material to ensure clean holes.
Conclusion
Using an angle drill guide helps you drill straight and accurate holes. It keeps the drill steady and saves time. Always set the guide firmly before starting. Practice a few times to get comfortable with the tool. This simple step improves your work quality a lot.
Keep your workspace clean and safe while drilling. With patience, your skills will improve quickly. Angle drill guides make many projects easier and neater. Try it on your next task for better results.