

If you’ve ever struggled to drill in tight spaces, the Milwaukee Right Angle Drill Attachment is about to become your new best friend. This handy tool lets you reach spots that are hard or even impossible with a regular drill.
But how do you get the most out of it? In this guide, you’ll discover simple, step-by-step tips to use the attachment safely and effectively. By the end, you’ll be ready to tackle those tricky jobs with confidence and ease.
Keep reading to unlock the full potential of your Milwaukee tool and make your projects smoother than ever.

Credit: www.redtoolstore.com
Milwaukee Right Angle Drill Attachment Features
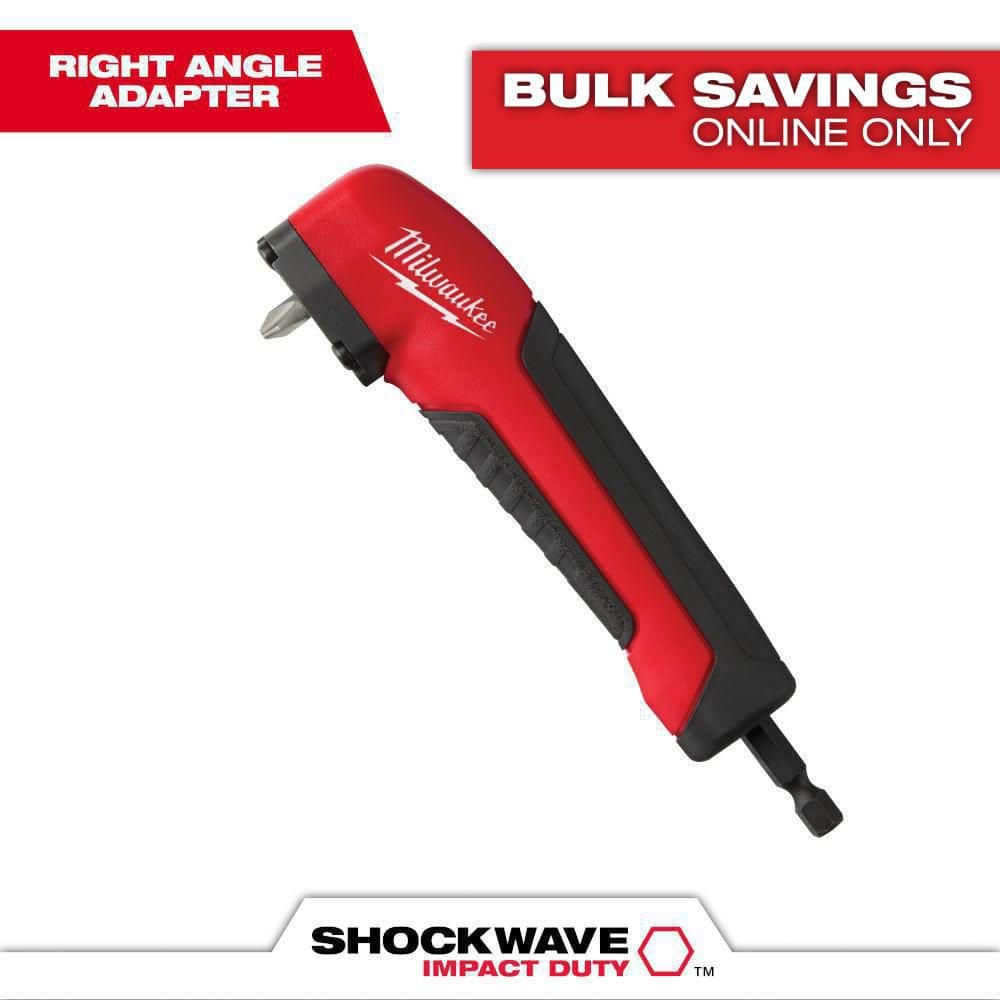
The Milwaukee Right Angle Drill Attachment offers practical features that improve your drilling tasks. It fits tight spaces and helps you work in hard-to-reach areas. This tool is built to last and designed for ease of use. Understanding its features helps you get the most from it.
Design And Build Quality
The attachment has a compact and sturdy design. It fits easily into narrow spaces without losing power. Milwaukee uses strong materials to ensure long life. The grip is comfortable, helping you control the drill better. It balances well to reduce hand fatigue during use.
Compatibility With Drill Models
This attachment works with many Milwaukee drills. It fits both corded and cordless models. The connection is secure, so it stays in place during work. You can switch it between drills quickly. This flexibility makes it a useful tool in any kit.
Key Functional Components
The attachment has a 90-degree head to reach tight spots. It includes a quick-release chuck for fast bit changes. The gear system transfers power efficiently without slipping. A locking mechanism keeps the attachment steady. These parts work together for smooth operation.
Setting Up The Attachment
Setting up the Milwaukee Right Angle Drill Attachment is easy and quick. Proper setup ensures smooth work and better results. Follow these steps carefully for a secure fit and correct angle adjustments.
Attaching To Your Drill
Start by turning off and unplugging your drill. Remove any existing bit or accessory from the chuck. Slide the right angle attachment into the drill’s chuck. Tighten the chuck firmly to hold the attachment in place. Check that the attachment is straight and secure before use.
Securing The Attachment Properly
Use the locking collar on the attachment to secure it fully. Twist the collar until it clicks or feels tight. This prevents slipping during operation. Test the attachment by gently pulling to confirm it won’t move. A secure fit reduces wobbling and improves safety.
Adjusting For Different Angles
The attachment allows you to work in tight spaces with ease. Most models rotate or pivot to different angles. Loosen the adjustment knob or lever to change the angle. Set the angle you need, then tighten the knob firmly. Make small test runs to check the angle and stability.
Techniques For Effective Use
The Milwaukee Right Angle Drill Attachment makes drilling in tight spaces easier. Using the right techniques improves your work quality and safety. Follow simple steps to get the best results from this tool.
Drilling In Tight Spaces
Place the attachment carefully in small or narrow areas. Make sure the drill bit aligns with the spot you want to drill. Use slow, steady pressure to avoid slipping or damaging the material. Keep your hands clear to prevent accidents.
Maintaining Control And Stability
Hold the drill and attachment firmly with both hands. Keep your body balanced and steady while working. Avoid sudden movements to keep the drill bit steady. Use clamps or supports to secure the workpiece if possible.
Speed And Torque Settings
Choose the right speed for the material you drill. Use low speed for hard materials like metal. Use higher speed for soft materials like wood. Adjust torque settings to prevent stripping screws or damaging surfaces.
Safety Tips While Using The Attachment
Using the Milwaukee Right Angle Drill Attachment makes drilling in tight spaces easier. Safety is very important when using this tool. Following safety tips helps prevent injuries and damage. Focus on protection, hazard awareness, and correct tool care.
Personal Protective Equipment
Always wear safety glasses to protect your eyes from debris. Use gloves to keep your hands safe from sharp edges. Wear ear protection to avoid hearing damage from loud noises. Use a dust mask if you drill materials that create dust. Dress in close-fitting clothes to avoid getting caught in moving parts.
Avoiding Common Hazards
Check the attachment and drill for damage before use. Make sure the drill is off before attaching or removing the right angle tool. Keep your workspace clean and free of clutter. Watch out for electrical wires or pipes inside walls. Do not force the drill; let it work at its own speed. Stay alert and avoid distractions during operation.
Proper Handling And Storage
Hold the drill and attachment firmly with both hands. Keep your fingers away from the drill bit and moving parts. After use, clean the attachment to remove dust and debris. Store the tool in a dry place to prevent rust. Keep it out of reach of children and untrained users. Regularly inspect the attachment for wear and tear.
Maintenance And Troubleshooting
Maintaining your Milwaukee Right Angle Drill Attachment keeps it working well for a long time. Regular care stops damage and improves performance. Troubleshooting helps fix small problems fast. This saves time and money. Follow these simple steps to keep your tool in top shape.
Cleaning After Use
Remove dust and debris after each use. Use a soft brush or cloth to clean tight spaces. Avoid water or harsh chemicals that can cause rust. Dry the attachment fully before storing it away. Clean tools last longer and work better.
Lubrication And Care
Apply light machine oil to moving parts regularly. This reduces friction and prevents wear. Check the user manual for oil type and frequency. Store the attachment in a dry place. Keep it away from extreme heat or moisture. Proper care keeps your drill attachment smooth and reliable.
Fixing Common Issues
If the attachment feels stiff, clean and lubricate it first. Check for worn or damaged parts and replace if needed. Tighten loose screws or bolts carefully. If the drill does not rotate, check the connection to the drill. Seek professional help for electrical or serious mechanical issues. Early fixes prevent bigger problems later.
Credit: www.homedepot.com
Expert Tips For Maximizing Performance
Using the Milwaukee Right Angle Drill Attachment correctly improves your work speed and accuracy. Small tips can boost its performance and make your tasks easier. Focus on the right tools and techniques to get the best results. Here are expert tips to help you maximize this attachment’s use.
Choosing The Right Drill Bits
Select drill bits that fit the attachment and job well. Use bits designed for right-angle drilling to avoid slipping or damage. Pick the correct size for the hole you need. Sharp bits cut cleaner and require less effort. Replace dull bits quickly to keep performance high. Using the right bit extends the life of both the drill and attachment.
Using Extensions And Accessories
Extensions help reach tight or awkward spaces. Attach them firmly to avoid wobbling or loss of power. Use compatible accessories made for Milwaukee tools. Avoid cheap or generic parts that may not fit well. Secure all connections before starting your work. Proper setup ensures smooth operation and safety. Keep extensions short when possible for better control.
Optimizing For Different Materials
Adjust speed and pressure based on the material type. Use slower speeds for metals to avoid overheating bits. Wood allows faster drilling but watch for splintering. For plastics, use steady, gentle pressure to prevent cracks. Test on scrap material first to find the best settings. Change bits if drilling through tough or mixed materials. Proper adjustment preserves tool life and improves hole quality.

Credit: www.stoneshc.com
Frequently Asked Questions
How Do I Attach The Milwaukee Right Angle Drill?
To attach, align the right angle attachment with your drill’s chuck. Insert and tighten securely for safe use. Ensure it fits snugly to avoid slipping during operation.
Can The Right Angle Drill Attachment Fit All Milwaukee Drills?
It fits most Milwaukee cordless drills with a 1/2-inch chuck. Check your drill’s compatibility before purchasing. This ensures optimal performance and prevents damage.
What Materials Can I Drill With This Attachment?
You can drill wood, metal, plastic, and drywall. It is designed for tight spaces where standard drills don’t fit. Always use the correct drill bit for the material.
How Do I Maintain The Milwaukee Right Angle Drill Attachment?
Keep it clean and free from debris after use. Lubricate the moving parts occasionally to prevent wear. Store in a dry place to avoid rust and damage.
Conclusion
Using the Milwaukee right angle drill attachment makes tight spaces easier to work in. It fits well on your drill and turns hard angles simple. Always check the attachment fits your drill before starting. Keep your hands steady and work slowly for best results.
This tool helps reach spots normal drills cannot. Try it on small projects to see how it helps. Practice makes the process smoother and faster. This attachment is useful for both home and work tasks. Give it a chance, and you might find it very handy.