
An air nail gun uses compressed air to drive nails into wood or other materials quickly and efficiently. This guide explains the inner workings, setup, operation, and safety of pneumatic nail guns so you can use them confidently on any project.
Key Takeaways
- Compressed air powers the nail gun: An air compressor supplies high-pressure air that drives a piston to fire nails.
- Trigger mechanisms vary: Most models use either sequential (safe) or contact (fast) triggers—know the difference for safety.
- Proper setup is crucial: Connect the gun to the compressor, adjust pressure, and load nails correctly before use.
- Maintenance extends tool life: Regular cleaning, lubrication, and part inspection prevent jams and wear.
- Safety comes first: Always wear eye and ear protection, and never point the gun at people or yourself.
- Troubleshooting is simple: Common issues like misfires or jams often stem from low air pressure or incorrect nails.
- Choose the right nail gun: Framing, finish, and brad nailers serve different purposes—match the tool to your project.
How Does an Air Nail Gun Work? A Complete Guide
If you’ve ever watched a construction worker zip through framing or trim work with lightning speed, chances are they were using an air nail gun. These powerful tools make fastening nails fast, precise, and less tiring than hammering by hand. But how exactly does an air nail gun work? In this guide, we’ll break down the mechanics, walk you through setup and operation, share safety tips, and help you troubleshoot common issues—all so you can use your pneumatic nail gun like a pro.
Whether you’re a DIY enthusiast or a professional contractor, understanding how your tools work helps you use them more effectively and safely. Let’s dive in.
What Is an Air Nail Gun?
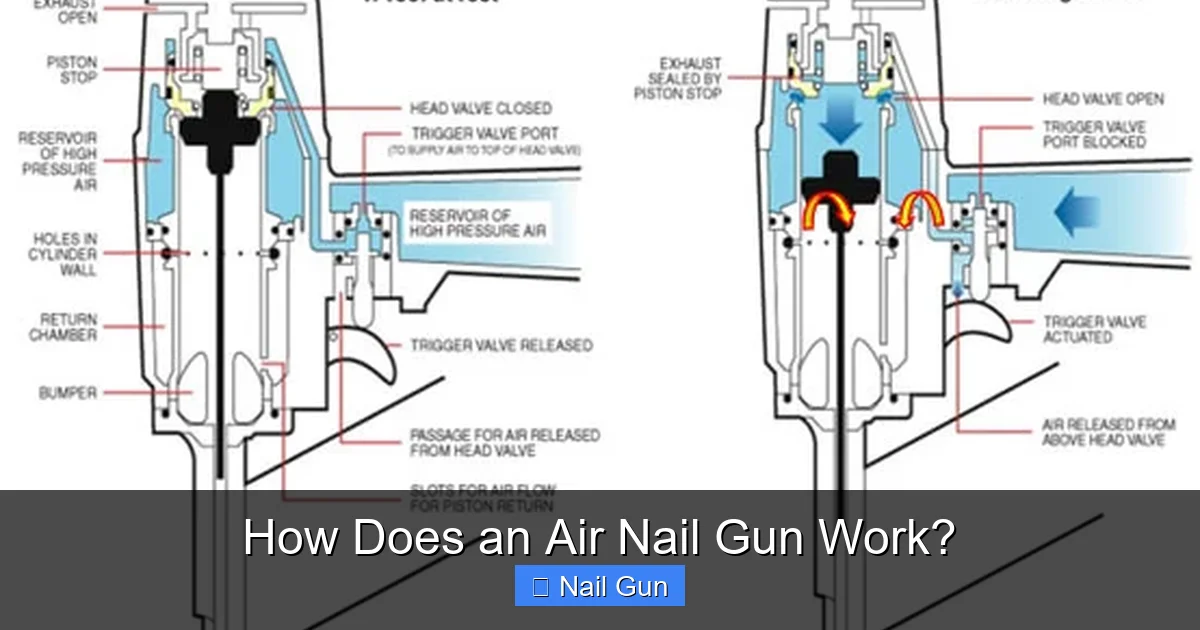
Visual guide about How Does an Air Nail Gun Work?
Image source: everwinpneumatic.com
An air nail gun, also known as a pneumatic nail gun, is a power tool that uses compressed air to drive nails into wood, drywall, or other materials. Unlike battery-powered or fuel-driven nailers, air nail guns rely on an external air compressor to generate the force needed to fire nails.
These tools come in various types—framing nailers, finish nailers, brad nailers, and roofing nailers—each designed for specific tasks. But despite their differences, they all operate on the same basic principle: compressed air drives a piston that strikes the nail, pushing it into the material.
The Science Behind the Power: How Compressed Air Works
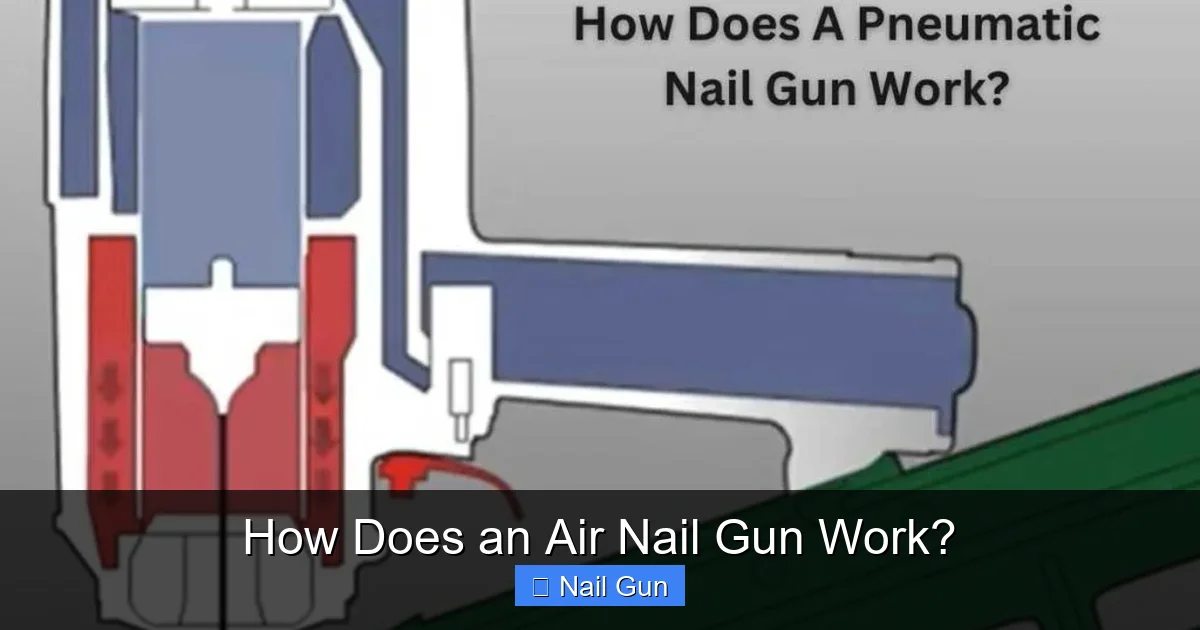
Visual guide about How Does an Air Nail Gun Work?
Image source: toolsmirror.com
At the heart of every air nail gun is compressed air. Here’s how it all comes together:
Step 1: Air Compression
An electric or gas-powered air compressor draws in atmospheric air and compresses it into a storage tank. This increases the air pressure—typically between 70 and 120 PSI (pounds per square inch)—depending on the tool’s requirements.
Step 2: Air Delivery
High-pressure air travels from the compressor through a flexible air hose connected to the nail gun. The hose must be rated for the compressor’s pressure to avoid leaks or bursts.
Step 3: Trigger Activation
When you press the trigger, a valve opens, allowing compressed air to enter the gun’s cylinder. This sudden rush of air pushes a piston forward with great force.
Step 4: Nail Firing
The piston strikes the head of a nail loaded in the magazine. The kinetic energy transfers to the nail, driving it into the workpiece. After firing, a return spring or residual air pressure resets the piston for the next shot.
This entire process happens in milliseconds, allowing for rapid, consistent nail placement.
Types of Air Nail Guns and Their Uses
Not all air nail guns are the same. Choosing the right one depends on your project. Here are the most common types:
Framing Nailers
These heavy-duty tools drive large nails (2 to 3.5 inches) into lumber for building frames, decks, and sheds. They’re powerful and fast, ideal for rough construction work.
Finish Nailers
Used for trim, molding, and cabinetry, finish nailers fire smaller, gauge-specific nails (15 to 16 gauge) that leave minimal holes. They provide a clean, professional look.
Brad Nailers
Even smaller than finish nailers, brad nailers use 18-gauge nails for delicate tasks like attaching thin moldings or securing lightweight trim without splitting the wood.
Roofing Nailers
Designed for asphalt shingles, these guns use coil-fed nails and are built to withstand outdoor conditions. They’re essential for roofing projects.
Staple Guns (Pneumatic)
While not nail guns per se, pneumatic staple guns work similarly and are used for upholstery, insulation, and fastening fabric or wire.
Setting Up Your Air Nail Gun
Before you start nailing, proper setup is essential for performance and safety.
Step 1: Choose the Right Compressor
Check your nail gun’s manual for required PSI and CFM (cubic feet per minute). Most nail guns need 70–120 PSI and 0.5–2.0 CFM. A small pancake compressor works for light tasks, while larger jobs may need a 6-gallon or bigger unit.
Step 2: Connect the Air Hose
Attach a high-quality air hose to the compressor’s outlet and the nail gun’s air inlet. Use quick-connect fittings for easy attachment and removal. Ensure all connections are tight to prevent air leaks.
Step 3: Adjust the Air Pressure
Turn on the compressor and let it build pressure. Then, use the regulator knob to set the PSI to the manufacturer’s recommendation. Too little pressure causes weak drives; too much can damage materials or the tool.
Step 4: Load the Nails
Open the magazine and insert a strip or coil of compatible nails. Make sure they’re facing the correct direction (usually head-up). Close the magazine securely.
Step 5: Test Fire (Safely)
Point the gun at a scrap piece of wood and pull the trigger. Listen for a clean “thump” and check that the nail is driven to the correct depth. Adjust pressure or depth settings if needed.
Operating the Nail Gun: Step-by-Step
Now that your tool is ready, here’s how to use it safely and effectively.
Step 1: Wear Safety Gear
Always wear safety glasses to protect your eyes from flying debris and ear protection to reduce noise. Consider gloves and a dust mask for added safety.
Step 2: Position the Gun
Place the nose of the nail gun firmly against the workpiece at a 90-degree angle. This ensures straight, consistent nail placement.
Step 3: Choose the Trigger Mode
Most air nail guns have two trigger modes:
- Sequential Trigger: You must press the nose against the surface first, then pull the trigger. This is the safest mode and required for most finish work.
- Contact Trigger: You can hold the trigger and “bump” the nose to fire rapidly. Great for speed but increases accident risk—use with caution.
Step 4: Fire the Nail
Press the nose firmly into the material and pull the trigger. The nail should drive in smoothly. If it doesn’t go all the way, increase air pressure slightly.
Step 5: Adjust Nail Depth (If Available)
Many nail guns have a depth adjustment wheel. Turn it to control how deep the nail sinks. For flush finishes, set it so nails sit just below the surface.
Safety Tips You Can’t Ignore
Air nail guns are powerful and can cause serious injury if misused. Follow these safety rules:
- Never point the gun at anyone—even when unloaded. Accidental discharges happen.
- Disconnect the air hose when loading nails, clearing jams, or storing the tool.
- Keep your hands clear of the firing area. Use clamps to hold workpieces instead of your fingers.
- Work in a well-ventilated area—compressors can produce fumes, especially gas-powered ones.
- Store the gun safely—keep it in a dry place, away from children.
Maintenance and Care
Regular maintenance keeps your air nail gun running smoothly and extends its lifespan.
Clean After Each Use
Wipe down the exterior with a dry cloth. Use compressed air to blow out dust and debris from the magazine and nosepiece.
Lubricate Moving Parts
Add 2–3 drops of pneumatic tool oil into the air inlet before each use. This lubricates internal components and prevents rust. Never use WD-40—it attracts dirt.
Inspect for Wear
Check O-rings, seals, and the driver blade for cracks or wear. Replace damaged parts promptly.
Store Properly
Keep the gun in its case or a dry toolbox. Store nails separately to avoid moisture damage.
Troubleshooting Common Problems
Even the best tools can have issues. Here’s how to fix the most common problems:
Misfires or Weak Drives
- Check air pressure—increase PSI if too low.
- Ensure the compressor can deliver enough CFM.
- Verify you’re using the correct nail size and type.
Nail Jams
- Turn off the compressor and disconnect the hose.
- Open the magazine and remove the jammed nail with pliers.
- Check for bent nails or debris in the firing channel.
Air Leaks
- Inspect the air hose for cracks or loose fittings.
- Check O-rings and seals—replace if damaged.
- Ensure the quick-connect fittings are fully engaged.
Nails Not Sinking Fully
- Increase air pressure slightly.
- Adjust the depth setting.
- Make sure the workpiece isn’t too hard or dense.
Conclusion
An air nail gun is a powerful, efficient tool that can transform the way you work with wood and other materials. By understanding how compressed air drives the piston to fire nails, you gain insight into proper setup, operation, and maintenance. Whether you’re building a deck, installing trim, or tackling a DIY project, a well-maintained pneumatic nail gun saves time, reduces fatigue, and delivers professional results.
Remember: safety, preparation, and regular care are the keys to success. Choose the right tool for the job, follow the steps in this guide, and always respect the power of compressed air. With practice, you’ll be driving nails like a pro in no time.