
Are you tired of seeing your plants suffer from soggy soil and root rot? The secret to healthy, thriving plants often lies beneath the surface—right in your ceramic pots.
But how do you make sure your pots have the right drainage without breaking them? Drilling drainage holes in ceramic pots might sound tricky, but with the right steps, you can do it safely and effectively. Keep reading, and you’ll learn exactly how to give your plants the drainage they need to flourish.
Tools Needed
Drilling drainage holes in ceramic pots needs the right tools. Using proper equipment makes the job easier and safer. This section explains what tools you need to prepare before starting.
Choosing The Right Drill Bit
Select a diamond-tipped or carbide drill bit. These bits cut through ceramic without cracking it. Regular bits can cause damage or break the pot. Pick a size that matches your drainage needs. Small bits work for tiny holes; bigger bits create larger holes.
Safety Gear Essentials
Wear safety goggles to protect your eyes from dust and shards. Use a dust mask to avoid breathing ceramic particles. Gloves protect your hands from sharp edges and hot surfaces. Keep a clean workspace to prevent accidents.
Additional Supplies
Have a piece of wood or rubber mat to place under the pot. This supports the pot and stops it from slipping. Use painter’s tape on the drilling spot to reduce cracks. Keep a spray bottle with water ready to cool the drill bit and ceramic while drilling.
Credit: h2obungalow.com
Preparing The Pot
Preparing a ceramic pot for drilling drainage holes is an important step. It helps avoid cracks and ensures a clean hole. Taking time to prepare the pot properly makes the drilling process easier and safer. Follow these steps carefully before you start drilling.
Cleaning The Surface
Start by cleaning the pot’s surface where you will drill. Dirt or dust can cause the drill to slip. Use a damp cloth to wipe the area well. Remove any grease or residue. Let the pot dry completely before moving on.
Marking Hole Locations
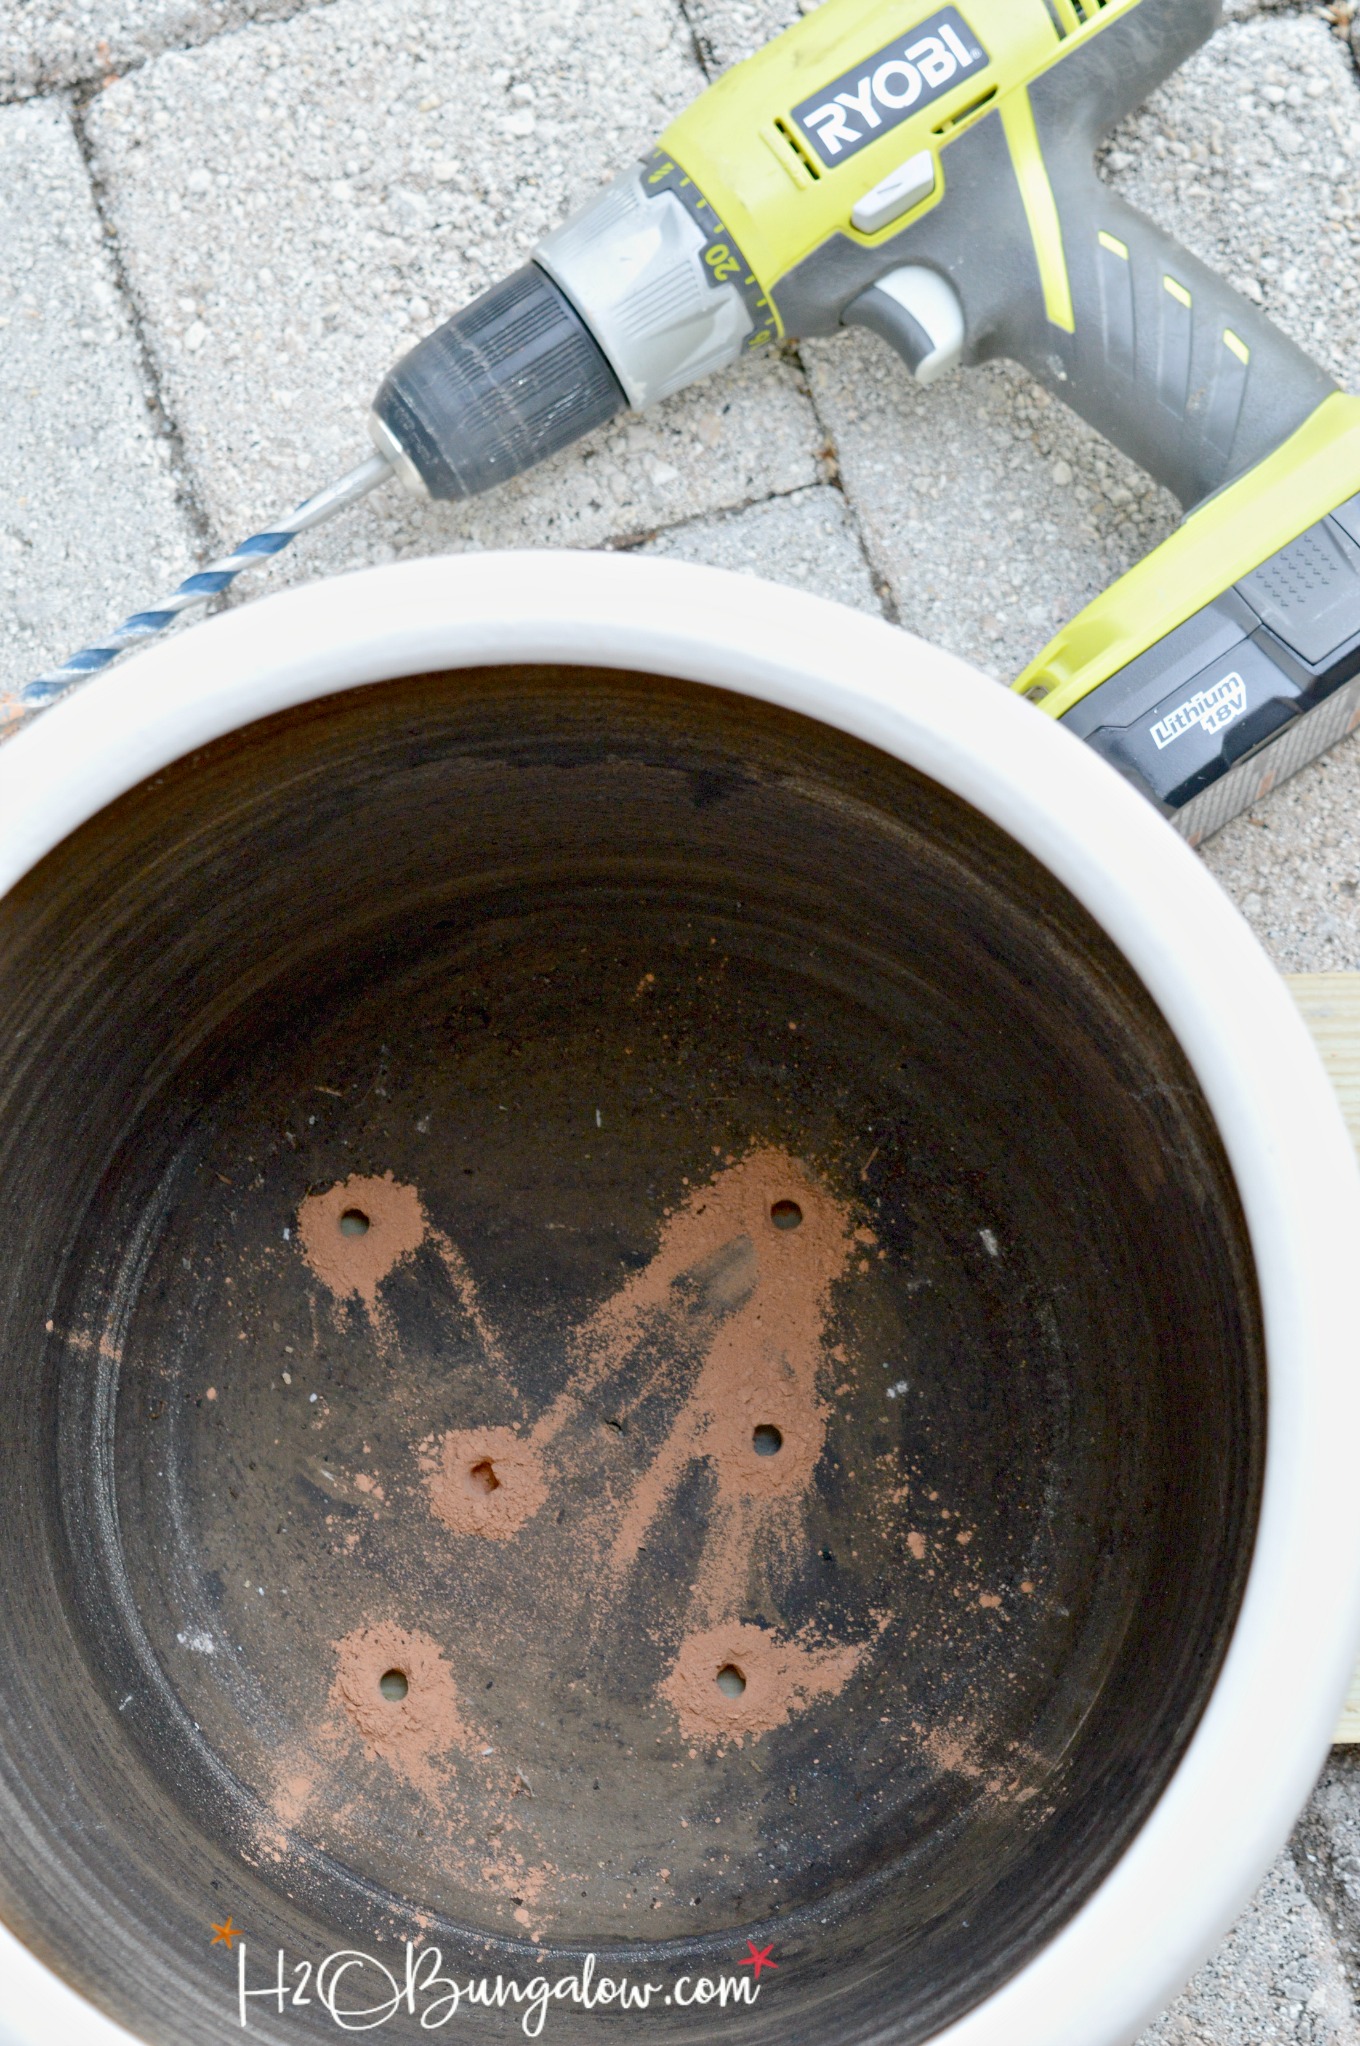
Decide where to place the drainage holes. Usually, the center or near the bottom works best. Use a pencil or marker to make small dots. Mark multiple spots if you want several holes. Check that marks are evenly spaced for good water flow.
Drilling Process
Drilling drainage holes in ceramic pots needs care and patience. The process requires the right tools and steps. Following a clear method helps avoid cracks and damage. Below are key steps to drill holes safely and effectively.
Setting Up The Drill
Choose a drill with a diamond or carbide-tipped bit. These bits cut through ceramic smoothly. Secure the pot on a flat surface. Use a clamp or towel to keep it steady. Mark the spot where the hole will go with a pencil. Wear safety glasses to protect your eyes from dust.
Drilling At The Correct Speed
Set the drill to a low speed. High speed can crack the ceramic. Apply gentle, steady pressure while drilling. Let the drill do the work; don’t force it. Stop occasionally to check progress and avoid overheating.
Using Water To Cool The Drill Bit
Keep the drill bit cool with water. Spray or drip water on the drilling area. This prevents the bit from overheating and breaking. Water also reduces dust and makes drilling easier. Continue adding water as you drill through the ceramic.

Credit: www.youtube.com
Finishing Touches
After drilling drainage holes in your ceramic pots, the job is not done yet. Finishing touches ensure the pot is safe and ready for planting. These steps protect the pot and your plants from damage. They also improve the look and function of the pot.
Smoothing Rough Edges
The drilled holes may have sharp or rough edges. These edges can hurt your hands or damage plant roots. Use sandpaper or a small file to smooth the edges carefully. Move gently around the hole until the surface feels smooth. This step prevents cracks from forming later. It also keeps the pot looking neat and safe.
Cleaning Debris
Drilling creates dust and small ceramic pieces. These can block the drainage holes or harm plants. Use a soft brush or cloth to remove all debris. Rinse the pot with water to wash out tiny particles. Let the pot dry completely before adding soil. Clean holes help water flow freely and keep plants healthy.
Tips For Success
Drilling drainage holes in ceramic pots needs care and patience. Small mistakes can cause cracks or damage. Following simple tips makes the process easier and safer. These tips help you get clean holes without breaking the pot. Take your time and prepare well for the best results.
Avoiding Cracks
Start by using a drill bit made for ceramic or glass. Use low speed on your drill to stop overheating. Keep the drill steady and do not press too hard. Place tape over the spot before drilling for extra grip. Cool the area with water to lower heat and reduce cracks.
Drilling Multiple Holes
Mark all hole spots before drilling. Drill one hole at a time, then move to the next. Let the drill bit cool between holes by pausing. Keep the pot stable on a soft surface to avoid slipping. Space holes evenly to improve water drainage and pot strength.
Maintenance Of Drill Bits
Clean your drill bits after each use to remove dust and debris. Check for wear or dullness before starting a new project. Sharpen or replace bits that are damaged or dull. Store bits in a dry place to prevent rust. Proper care extends drill bit life and improves performance.

Credit: www.youtube.com
Frequently Asked Questions
How Do I Drill Drainage Holes In Ceramic Pots Safely?
Use a diamond-tipped drill bit and wear safety goggles. Keep the pot wet to reduce dust and heat. Drill slowly to avoid cracking the ceramic. Support the pot firmly while drilling.
What Tools Are Best For Drilling Ceramic Pots?
A diamond or carbide-tipped drill bit is best. Use a power drill with variable speed. Have water handy to cool the drill bit. Safety goggles and gloves are recommended.
Can I Drill Drainage Holes Without Breaking My Pot?
Yes, by drilling slowly and keeping the pot wet. Use the correct drill bit and apply gentle pressure. Supporting the pot properly also prevents cracks. Patience is key to avoid breakage.
Why Are Drainage Holes Important In Ceramic Pots?
Drainage holes prevent waterlogging and root rot in plants. They help excess water escape, promoting healthy root growth. Proper drainage improves plant health and longevity.
Conclusion
Drilling drainage holes in ceramic pots helps plants grow healthy roots. Use the right tools and take safety steps. Work slowly to avoid cracks or breaks. Clean the pot after drilling to remove dust. This simple step keeps plants happy and soil well-drained.
Now your pots are ready for planting. Try it yourself and enjoy better plant care. Easy and useful for any gardener.