
Are you ready to hang shelves, mount a mirror, or install a towel rack on your tile wall but unsure how to drill without cracking the tile? Drilling into tile can feel tricky and nerve-wracking, especially if you want to avoid costly mistakes.
But with the right tools and techniques, you can do it yourself confidently and safely. This guide will walk you through every step, helping you achieve a perfect hole without damaging your tiles. Keep reading to learn the simple secrets that make drilling into tile easy and stress-free.
Choosing The Right Tools
Choosing the right tools is key to drilling into a tile wall safely and effectively. Using the wrong drill bit or gear can cause cracks or damage. The correct tools help you work faster and protect your wall.
Understanding which drill bits suit tiles and what safety gear to wear improves your results. This section covers the best drill bits and essential safety equipment.
Types Of Drill Bits For Tiles
Tile walls need special drill bits made for hard, smooth surfaces. Carbide-tipped bits work well on ceramic and porcelain tiles. They cut cleanly without cracking the tile.
Diamond-tipped drill bits are ideal for very hard or thick tiles. They last longer and give precise holes. Use a low drill speed to avoid overheating.
Masonry bits can work on tiles but may cause chips or cracks. Choose bits designed specifically for tile for best results.
Essential Safety Gear
Protect your eyes with safety goggles to catch flying debris. Tiles can shatter unexpectedly during drilling.
Wear gloves to protect your hands from sharp tile edges and the drill bit. Gloves also improve grip on the drill.
Use a dust mask to avoid breathing in tile dust. Tile dust can irritate your lungs and throat.
Work in a well-lit area to see clearly and avoid mistakes. Good lighting helps you control the drill better.
Preparing The Tile Surface
Preparing the tile surface is the first step before drilling into a tile wall. It helps avoid cracks and keeps the drill bit steady. Proper preparation ensures a clean, precise hole without damage to the tile.
Cleaning And Marking The Spot
Start by cleaning the tile surface with a soft cloth and mild cleaner. Dirt or grease can cause the drill bit to slip. Dry the tile completely before marking the spot.
Use a pencil or a marker to mark where you want to drill. Make sure the mark is clear and easy to see. A well-marked spot helps you drill accurately.
Using Tape To Prevent Slipping
Place a piece of masking tape over the marked spot. The tape adds grip and stops the drill bit from sliding. This simple step protects the tile and helps you drill straight.
Press the tape firmly so it sticks well. You can draw the mark again on the tape if it is hard to see. The tape also reduces the chance of cracking the tile.
Drilling Techniques
Drilling into a tile wall needs care to avoid cracks. Use a drill with a special bit for tiles and go slowly. Mark the spot clearly before starting to keep the hole precise.
Setting The Drill Speed
Start with a low drill speed to avoid cracking the tile. High speed can cause heat and damage. A slow speed lets you control the drill better. Increase speed slowly if needed, but keep it moderate. Use a drill with variable speed settings for best results.
Applying Proper Pressure
Press gently on the drill without forcing it. Too much pressure can break the tile. Let the drill bit do the work. Steady, light pressure helps keep the drill bit from slipping. Pause if you feel resistance and adjust your angle or speed.
Cooling The Drill Bit
Drilling creates heat that can ruin the drill bit and tile. Cool the bit by spraying water on it often. Take breaks to let the bit cool down. Use a wet sponge or cloth near the drill area. Cooling prevents overheating and keeps drilling smooth.

Credit: www.youtube.com
Handling Common Challenges
Drilling into a tile wall can be tricky. Tiles are hard but also fragile. Small mistakes can cause cracks or chips. Knowing how to handle these common problems saves time and money. It also keeps your wall looking good. Below are ways to deal with cracks and chips. Plus, tips to fix mistakes and damage.
Dealing With Cracks And Chips
Cracks and chips happen when the drill slips or pressure is too high. Start by using a small drill bit to make a guide hole. Use tape on the tile surface to stop slipping. Drill slowly and steadily. Avoid pushing too hard. If a crack appears, stop drilling immediately. Use clear nail polish on small cracks to stop them from growing. For chips, fill the gap with tile filler or epoxy. Smooth it carefully and let it dry. Painting over the repair can help it blend in.
Fixing Mistakes And Damage
Drilling mistakes can cause holes in the wrong spots or broken tiles. For small holes, use tile filler or putty. Apply it with a putty knife and smooth the surface. Let it dry and sand lightly if needed. For larger holes or broken tiles, replacement is best. Remove the damaged tile carefully. Use a chisel and hammer to avoid hurting nearby tiles. Clean the area before applying new adhesive. Place the new tile firmly and grout the edges. Wipe off extra grout before it hardens. Patience is key for a neat repair.
Finishing Touches
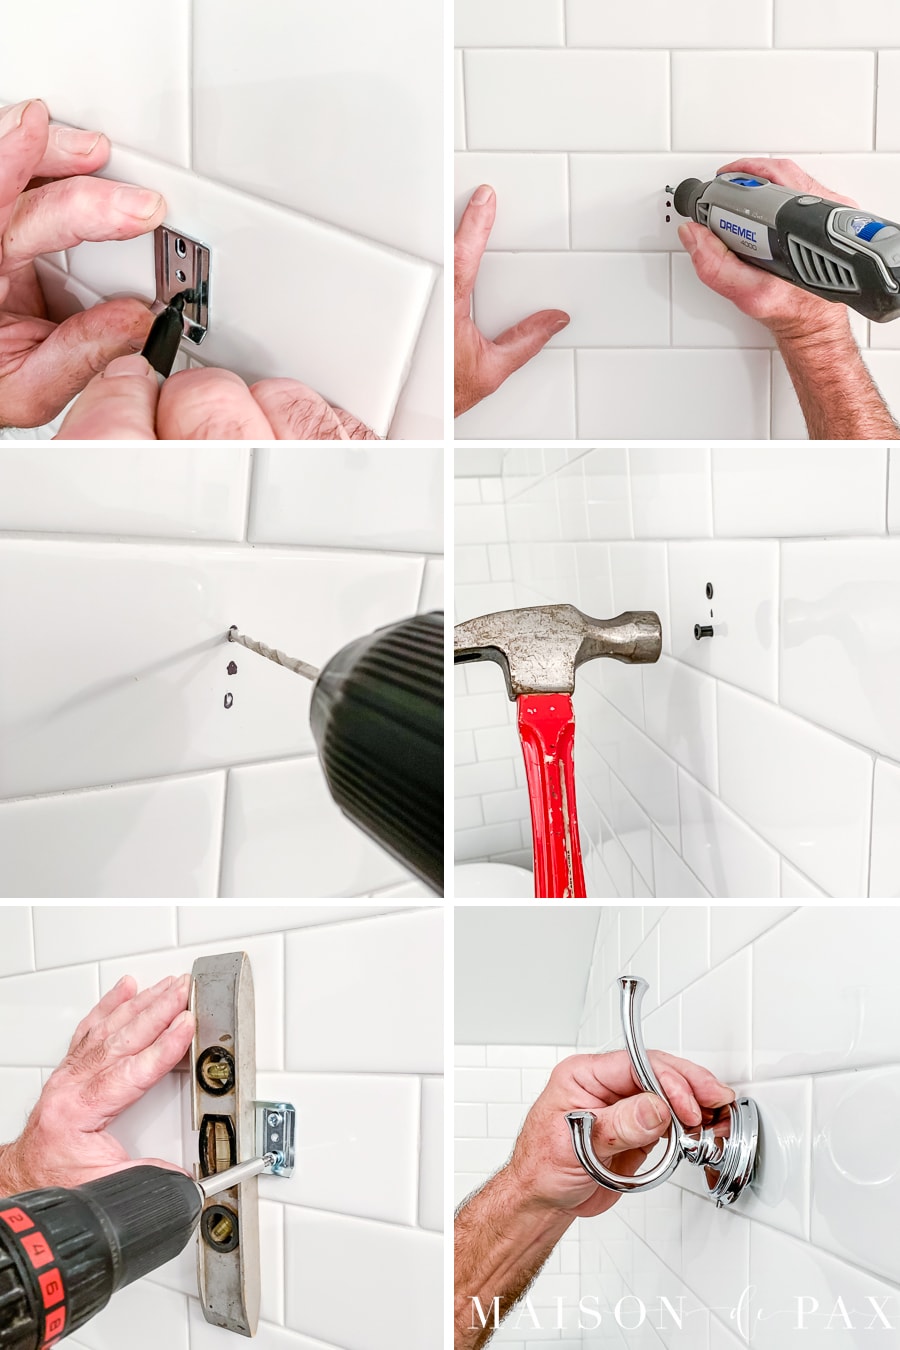
After drilling into a tile wall, the last steps are crucial for a clean and strong finish. Proper care ensures your work looks neat and lasts long. Focus on clearing debris and safely installing anchors and fixtures.
Cleaning Up Debris
Remove dust and small tile pieces carefully. Use a soft brush or a vacuum to clear the hole and surrounding area. This prevents dirt from affecting the anchor’s grip. Wipe the surface gently with a damp cloth to remove leftover dust. Clean tiles help maintain a smooth look and prevent damage.
Installing Anchors And Fixtures
Choose the right anchor for your tile type and weight load. Insert the anchor firmly into the hole. Tap it gently with a hammer if needed, but avoid cracking the tile. Attach your fixture by screwing into the anchor securely. Double-check the fixture is stable and flush with the wall. Proper installation avoids slipping and future repairs.
Credit: www.maisondepax.com

Credit: www.uglyducklinghouse.com
Frequently Asked Questions
What Tools Do I Need To Drill Into A Tile Wall?
You need a drill with a carbide or diamond-tipped bit, masking tape, a pencil, and safety goggles. These tools protect the tile and ensure precise drilling.
How Do I Prevent Tiles From Cracking When Drilling?
Place masking tape over the drilling spot to reduce slipping. Drill slowly with steady pressure to avoid cracking the tile surface.
Can I Use A Regular Drill Bit On Tile?
No, regular drill bits can crack tiles. Use a carbide or diamond-tipped bit specifically designed for tile to drill safely.
What Speed Should I Use When Drilling Tile?
Use a low drill speed to maintain control and prevent tile damage. High speed can cause overheating and cracking.
Conclusion
Drilling into a tile wall does not have to be hard. Use the right drill bit and take your time. Mark the spot carefully and start with a slow speed. Wear safety glasses to protect your eyes. Avoid pressing too hard to stop tiles from cracking.
With patience and care, you can hang shelves or pictures securely. Now you have the basic steps to drill into tile walls safely. Give it a try, and your home will look better in no time.