If you want to create strong, professional-looking joints in your woodworking projects, learning how to drill pocket holes with a Kreg Jig is a game-changer. Whether you’re building furniture, cabinets, or simple frames, this tool makes your work faster and more precise.
You’ll discover step-by-step how to use the Kreg Jig to drill perfect pocket holes every time. By the end, you’ll have the confidence to tackle your next project with stronger joints and a cleaner finish. Ready to improve your woodworking skills?
Let’s dive in!

Credit: www.anikasdiylife.com
Kreg Jig Basics
The Kreg Jig is a tool that helps make strong wood joints quickly. It is easy to use and perfect for many woodworking projects. Understanding the basics of the Kreg Jig will help you create neat and durable pocket holes. This section explains what the Kreg Jig is and the benefits of using pocket holes.
What Is A Kreg Jig
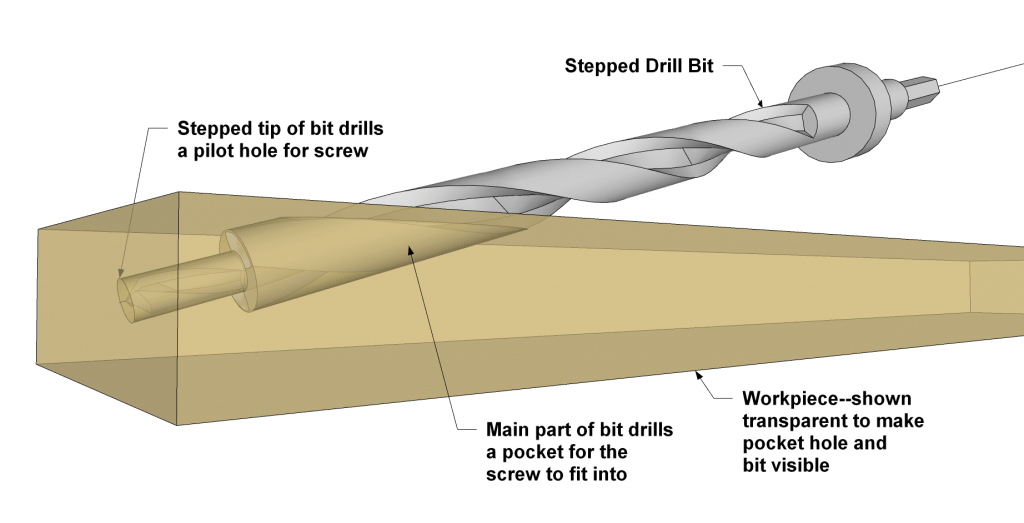
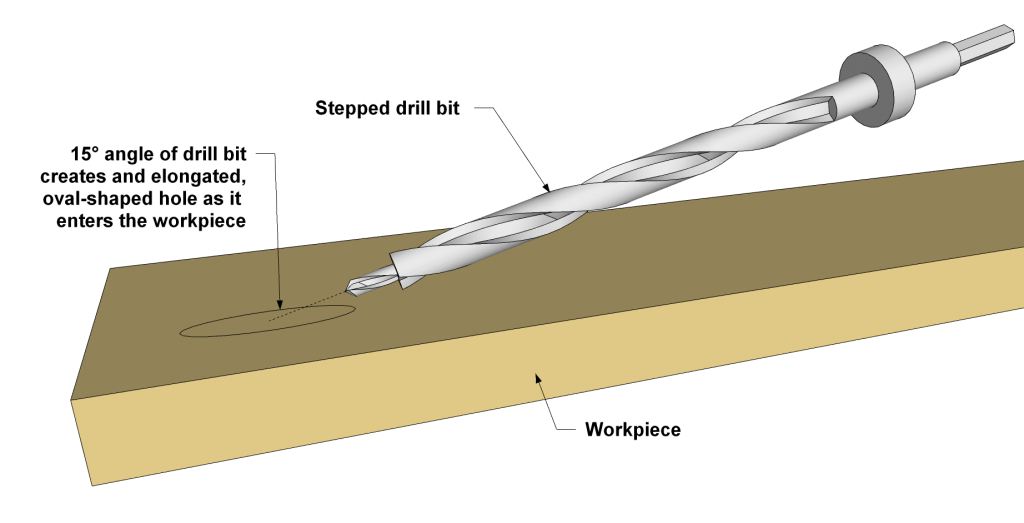
The Kreg Jig is a small device that guides your drill. It helps you drill angled holes called pocket holes. These holes allow screws to join two pieces of wood tightly. The jig holds the wood steady and ensures the hole is drilled at the right angle. It works with a special drill bit made for pocket holes.
The tool is simple to set up and use. It fits different wood thicknesses. This makes it useful for many types of projects, like furniture or shelves. The Kreg Jig helps make strong joints without visible screws on the outside.
Benefits Of Pocket Holes
Pocket holes create strong joints that last a long time. The screws pull the wood pieces tightly together. This makes the connection very stable. Pocket holes are faster to make than traditional wood joints. They do not need clamps or glue in most cases.
Using pocket holes also hides the screws inside the wood. This gives a clean and smooth look to your project. The holes can be filled or covered with wood plugs. This keeps the surface looking nice and professional.
Pocket hole joints are easy to repair or adjust if needed. They work well for many wood types and project sizes. This technique saves time and effort while making strong connections.
Tools And Materials Needed
Before starting to drill pocket holes with a Kreg Jig, gather all necessary tools and materials. Having everything ready saves time and helps create strong joints. This section lists the essential tools and recommended materials for the job.
Essential Tools
The Kreg Jig is the main tool needed to drill pocket holes accurately. A power drill with a drill bit matching the jig is required to create clean holes. A clamp holds the wood firmly in place, ensuring precision and safety. A screwdriver or drill driver helps drive the screws into the pocket holes. A tape measure or ruler measures the wood pieces for correct placement. Safety glasses protect your eyes from wood chips and dust during drilling.
Recommended Materials
Choose wood types like plywood, hardwood, or softwood depending on your project. Kreg pocket hole screws are designed to fit perfectly and create strong joints. Wood glue can add extra strength to the connection. Sandpaper smooths the wood surface before and after drilling. A pencil marks drilling spots clearly for accurate pocket hole placement.
Setting Up The Kreg Jig
Setting up the Kreg Jig correctly ensures strong and accurate pocket holes. It helps avoid mistakes and saves time during your woodworking project. Follow these simple steps to prepare your jig for drilling pocket holes.
Adjusting The Drill Bit Collar
The drill bit collar controls how deep the drill bit goes. Loosen the collar screw and slide it to the correct depth. Use the jig’s depth gauge to find the right spot. Tighten the collar screw firmly. This stops the bit from drilling too deep or shallow.
Setting The Stop Block
The stop block guides the wood in the jig. Place the block at the proper distance for your wood thickness. Tighten the stop block screws to keep it steady. This helps drill pocket holes in the same spot every time. It also keeps your workpiece from moving.
Choosing The Right Drill Bit
Use the drill bit that comes with your Kreg Jig. It is designed for pocket hole drilling. The stepped bit creates clean holes and prevents wood splitting. Check the bit for sharpness before starting. Replace it if it is dull for best results.
Marking And Clamping Wood
Marking and clamping wood is a key step before drilling pocket holes with a Kreg Jig. It helps ensure accurate hole placement and strong joints. Taking time here makes the rest of the project easier and cleaner.
Proper marking guides the drill bit to the right spot. Clamping holds the wood steady and safe during drilling. Both steps reduce mistakes and improve final results.
Measuring For Pocket Holes
Start by measuring where the pocket holes will go. Use a ruler or tape measure to mark the exact points. Marking with a pencil gives clear, visible guides. Make marks on the wood edge, where the jig will clamp.
Check the wood thickness. It affects hole depth and screw size. Measure carefully to avoid drilling too close to the edge or too far in. Consistent marks help keep pocket holes evenly spaced.
Proper Clamping Techniques
Clamping the wood tightly stops movement during drilling. Use a clamp that fits the wood size and shape. Position the clamp to hold the wood firmly against the jig base.
Double-check the wood is flush with the jig face. This ensures the drill bit enters at the right angle. Avoid over-tightening, which can damage the wood or jig. Steady clamping prevents crooked or off-center holes.
Drilling Pocket Holes
Drilling pocket holes with a Kreg Jig is a simple way to join wood pieces tightly. It creates angled holes that hide screws inside the wood. This method makes strong joints without visible fasteners. Proper drilling is key for solid results. Follow these steps to drill pocket holes correctly.
Correct Drill Speed
Set your drill to a low or medium speed. High speed can burn the wood or damage the bit. Slow speed helps the drill bit cut cleanly and smoothly. Use a speed between 600 and 1500 RPM for best results. This range works well for most wood types and thicknesses.
Maintaining Drill Angle
Keep the drill straight and steady. The Kreg Jig guides the drill at the correct angle. Hold the drill firmly and follow the jig’s slot without tilting. A wrong angle makes weak or crooked holes. Steady drilling ensures screws fit perfectly and hold tight.
Joining Wood Pieces
Joining wood pieces with a Kreg Jig creates strong, clean connections. This method hides screws inside the wood, giving your project a neat look. It also makes the joint very durable. Proper joining requires the right screws and precise alignment. These steps ensure your work lasts long and looks professional.
Choosing Screws
Select screws made for pocket hole joinery. Kreg screws have a special design for better grip. Choose the right length based on wood thickness. Short screws can cause weak joints. Long screws may split the wood. Using the correct screws prevents problems and strengthens connections.
Aligning And Securing Joints
Keep wood pieces flush before tightening screws. Use clamps to hold pieces steady. Misalignment causes gaps or weak joints. Drill pocket holes at proper angles. Tighten screws slowly to avoid stripping holes. Proper alignment and secure fastening make strong, clean joints that last.
Tips For Cleaner Pocket Holes
Creating clean pocket holes improves the strength and look of your woodworking projects. Simple steps can reduce splintering and rough edges. The key is in preparation and finishing. Follow these tips for better results with your Kreg Jig.
Preventing Tear-out
Use a sharp drill bit designed for pocket holes. Dull bits cause splintering and rough holes. Clamp your workpiece firmly to stop movement during drilling. Drill at a steady speed, not too fast. This helps the bit cut cleanly through the wood. Consider placing a scrap piece under the drilling area. It supports the wood fibers and reduces tear-out.
Sanding And Finishing
Lightly sand the pocket hole edges with fine-grit sandpaper. This smooths rough spots without enlarging the hole. Remove dust with a soft brush or cloth before finishing. Apply wood filler if needed to hide gaps or imperfections. Finish with paint or stain to match your project. Clean pocket holes improve appearance and joinery strength.
Common Mistakes To Avoid
Drilling pocket holes with a Kreg Jig can be easy, but mistakes can cause problems. Avoiding common errors saves time and improves your work quality. Understanding these mistakes helps you use the jig correctly and get strong joints every time.
Incorrect Jig Setup
Setting up the jig wrong is a common error. The jig must match the wood thickness exactly. If the jig is too low or too high, the pocket hole will be off. Always measure your wood before adjusting the jig. Tighten all knobs firmly to keep the jig stable. A loose jig causes uneven holes and weak joints.
Overdrilling Or Underdrilling
Drilling too deep or too shallow is another frequent mistake. Overdrilling weakens the wood and can cause cracks. Underdrilling makes the screw not fit properly. Use the stop collar on the drill bit to control hole depth. Check the collar position before each hole. Consistent hole depth ensures strong and neat connections.
Maintenance And Storage
Keeping your Kreg Jig in good shape helps you drill perfect pocket holes every time. Proper maintenance and storage extend the life of the tool. It also keeps your work safe and smooth. Simple care steps make a big difference.
Cleaning The Jig
After each use, remove wood dust and debris. Use a soft brush to clean tight spots. Avoid water or harsh chemicals that can damage parts. Check the drill guide holes for blockages. Clear any sawdust or wood chips carefully. Clean metal parts with a dry cloth to prevent rust. Regular cleaning keeps the jig accurate and reliable.
Proper Storage Practices
Store your Kreg Jig in a dry, cool place. Avoid damp areas that cause rust or mold. Keep it in a toolbox or case to protect from dust. Store with drill bits removed to prevent damage. Place the jig where it won’t get knocked over or dropped. Good storage protects your tool and keeps it ready to use.
Credit: learn.kregtool.com
Credit: learn.kregtool.com
Frequently Asked Questions
What Is A Kreg Jig Used For?
A Kreg Jig creates pocket holes for strong wood joints. It allows angled drilling, making hidden screws easy. It’s ideal for furniture, cabinetry, and woodworking projects, ensuring tight, durable connections without visible fasteners.
How Do I Set The Drill Depth On Kreg Jig?
Adjust the drill bit collar to the wood thickness. Use the Kreg Jig guide to set the collar position. This controls the hole depth, ensuring screws fit perfectly without splitting the wood.
Can I Use Any Drill With A Kreg Jig?
Yes, most cordless or corded drills work with Kreg Jigs. Ensure your drill fits the drill bit and has enough power. A variable speed drill is ideal for better control.
What Screw Size Works Best For Pocket Holes?
Use Kreg pocket hole screws sized to your wood thickness. Typically, 1¼” screws suit ¾” wood, while 1½” screws are for thicker material. Correct screw size ensures strong joints without wood damage.
Conclusion
Drilling pocket holes with a Kreg Jig is simple and effective. Follow the steps carefully for strong joints. Practice on scrap wood to build confidence. Use the right drill bit and settings every time. This tool saves time and makes your projects neat.
Keep your workspace clean and organized for safety. With patience and care, your woodworking will improve. Try different wood types to see how the jig works. Enjoy creating sturdy furniture and crafts with ease. Give it a go, and watch your skills grow.