
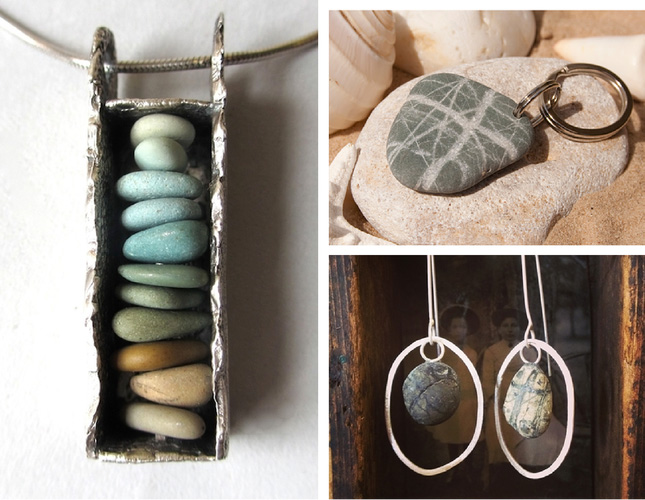
Have you ever wanted to create your own unique jewelry but felt unsure about how to start? Drilling stones for jewelry might sound tricky, but with the right tools and simple steps, you can turn plain stones into beautiful, wearable art.
Imagine adding your personal touch to necklaces, bracelets, or earrings by making your own stone beads. In this guide, you’ll discover easy techniques to drill stones safely and effectively, helping you bring your creative ideas to life. Ready to unlock the secrets of stone drilling?
Keep reading, and you’ll be crafting stunning jewelry pieces in no time.
Choosing The Right Stone
Choosing the right stone is the first step in making beautiful jewelry. The stone must be strong enough to handle drilling. It should also fit the design and style you want. Picking the right stone helps prevent damage during drilling and keeps your jewelry looking great.
Hardness And Durability
Hardness is how tough a stone is. Some stones are very hard and can resist scratches and cracks. Others are soft and can break easily. Durability means how well a stone can survive daily wear and tear. Stones with higher hardness and durability are best for drilling. They hold their shape and do not chip easily.
Popular Stones For Jewelry
Many stones work well for jewelry. Quartz, jasper, and agate are common choices. These stones are strong and have beautiful colors. Amethyst and turquoise are also popular. They are durable and easy to drill. These stones offer good results and last long in jewelry pieces.
Avoiding Fragile Materials
Some stones break or crack easily. Stones like opal, turquoise (low grade), and lapis lazuli can be fragile. They may have cracks inside or be too soft. Avoid these stones for drilling to prevent damage. Choose stones without visible cracks or weak spots. This keeps your jewelry safe and durable.
Credit: eternaltools.com
Selecting The Best Drill Bits
Selecting the best drill bits is key to drilling stones for jewelry. The right bit makes drilling easier and protects the stone from cracking. Different stones need different types of drill bits. Choosing bits that fit your project saves time and effort.
Diamond-coated Bits
Diamond-coated bits are the best for hard stones. The tiny diamonds cut through tough surfaces smoothly. These bits last longer than regular steel bits. They also reduce heat, which keeps stones safe. Use diamond-coated bits for stones like quartz, agate, or jasper.
Size And Shape Options
Drill bits come in many sizes and shapes. Small bits create fine holes for delicate jewelry. Larger bits make bigger holes for thicker pieces. Pointed bits start holes easily without slipping. Flat bits work well for wide, shallow holes. Choose size and shape based on your stone and design.
Maintaining Drill Bit Sharpness
Sharp drill bits cut better and last longer. Clean bits after each use to remove dust and stone bits. Use water or oil to cool the bit during drilling. Avoid pressing too hard, as it dulls the bit faster. Replace bits when they become dull or damaged for best results.
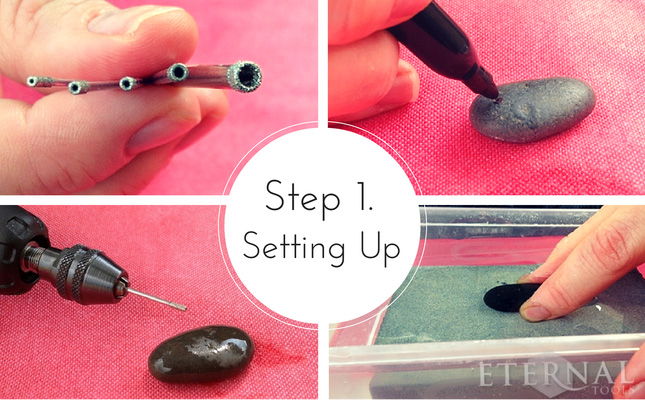
Preparing Your Workspace
Preparing your workspace is a key step before drilling stones for jewelry. A good setup helps you work safely and precisely. It also makes the process smoother and reduces mistakes.
Take time to arrange your tools and materials neatly. Clear space helps avoid accidents and keeps your focus sharp. A well-planned area supports steady hands and clean results.
Safety Gear Essentials
Wear safety goggles to protect your eyes from dust and chips. Use a dust mask to avoid breathing tiny stone particles. Gloves help protect your hands from sharp edges and vibrations. Dress in close-fitting clothes to prevent catching on tools. Keep a first aid kit nearby in case of small cuts or scrapes.
Stable Work Surface Setup
Choose a flat, sturdy table for your work surface. Avoid wobbly or uneven tables that cause slips. Place a non-slip mat or rubber pad on the table. This keeps stones from moving while drilling. Ensure good lighting over your workspace to see drill points clearly. Arrange tools within easy reach to avoid stretching or shifting.
Marking Drill Points Accurately
Use a fine-tip marker or pencil for precise marks. Check the stone from different angles before marking. Mark the drilling spot clearly but lightly to avoid permanent marks. Use a template or guide for consistent hole placement. Double-check measurements to prevent drilling errors. Keep marks small to avoid weakening the stone structure.

Credit: www.youtube.com
Drilling Techniques
Drilling stones for jewelry requires careful techniques to avoid damage. Proper methods ensure clean holes and preserve the stone’s beauty. Understanding key drilling techniques helps you work safely and effectively.
Using Water For Cooling
Water cools the drill bit and the stone. It stops heat buildup that can crack the stone. Keep the stone wet while drilling. Use a small container or spray bottle to add water. This simple step extends the drill bit’s life and protects the stone.
Starting With A Pilot Hole
A pilot hole guides the drill bit and prevents slipping. Use a small drill bit to create a shallow hole first. This hole makes drilling easier and more precise. It reduces the risk of breaking the stone. Always start gently to avoid sudden cracks.
Controlling Drill Speed And Pressure
Use slow drill speeds to avoid overheating. High speed can cause the stone to crack. Apply light, steady pressure without forcing the bit. Let the drill bit do the work. Too much pressure breaks the stone or dulls the bit. Patience is key for a smooth hole.
Avoiding Common Mistakes
Drilling stones for jewelry can be tricky. Small mistakes often cause big problems. Avoiding common errors helps you get clean, smooth holes. This section explains how to prevent usual issues.
Preventing Stone Cracks
Cracks ruin your stones and waste your effort. Use a slow drill speed to reduce heat. Heat makes stones fragile and easy to break. Keep water on the stone to cool it down. Hold the stone firmly but gently. Sudden pressure breaks the stone. Take breaks to avoid overheating.
Managing Drill Bit Slippage
Slipping bits cause uneven holes and scratches. Start with a small dent on the stone’s surface. Use masking tape to add grip for the drill bit. Hold the drill steady and straight. Avoid pushing too hard or fast. Let the drill do the work. Use drill bits made for hard stones.
Dealing With Uneven Holes
Uneven holes spoil the jewelry’s look. Mark the drilling spot clearly before starting. Keep the drill perpendicular to the stone. Move the drill gently and steadily. Check the hole depth often to keep it even. Use a guide or jig for better control. Practice on spare stones for skill.
Finishing Touches
After drilling stones for jewelry, the work is not done yet. Finishing touches make your pieces look professional and beautiful. This stage improves the stone’s feel and appearance. It ensures the jewelry is safe to wear and lasts long.
Smoothing Rough Edges
Drilling often leaves sharp or rough edges around the hole. Use fine sandpaper or a small file to smooth these edges carefully. Move gently to avoid cracking the stone. Smooth edges prevent cuts and make the stone more comfortable to wear.
Cleaning Drilled Stones
Drilling creates dust and residue on the stones. Rinse them under clean water to remove debris. Use a soft brush to clean inside the holes. Dry the stones with a soft cloth to avoid water spots. Clean stones look clearer and more attractive.
Polishing For Shine
Polishing brings out the stone’s natural shine. Use a polishing cloth or a buffing wheel with a small amount of polishing compound. Work slowly to avoid overheating the stone. Polished stones catch light better and enhance the jewelry’s beauty.
Tools And Materials Checklist
Drilling stones for jewelry needs the right tools and materials. Having a clear checklist makes the process smooth. It helps avoid mistakes and damage to your stones. Each tool and material plays a key role in safe and precise drilling.
This section lists all essentials for drilling stones. Keep these ready before starting your project. Proper preparation leads to better results and less frustration.
Diamond Drill Bits
Diamond drill bits are best for stone drilling. They cut through hard surfaces with ease. Choose bits sized for your stone and hole needs. Using the right bit avoids cracks and breaks.
Drill Machine
A drill machine with variable speed control works best. It allows slow drilling to protect stones. Handheld rotary tools or drill presses suit different projects. Make sure the drill holds bits firmly.
Water Or Lubricant
Water cools the stone and bit during drilling. It prevents overheating and dust. Some use special lubricants for smoother drilling. Keep the drill site wet to avoid damage.
Protective Gear
Wear safety glasses to protect your eyes from dust and chips. Use a mask to avoid breathing stone dust. Gloves protect your hands and improve grip. Safety gear keeps you safe and comfortable.
Clamps Or Holding Device
Secure the stone with clamps or a holding tool. It stops the stone from moving while drilling. A steady stone means cleaner holes and less risk of breaks.
Marking Tools
Use a pencil or marker to mark drill spots. Clear marks guide your drilling. This helps place holes exactly where you want them.
Cleaning Supplies
Have a soft brush and cloth ready. Clean stones after drilling to remove dust and debris. Clean stones show their beauty and finish well.
Troubleshooting Tips
Drilling stones for jewelry can be tricky. Problems happen often, but most can be fixed easily. Knowing some troubleshooting tips will save time and stones. Here are common issues and simple ways to solve them.
Handling Broken Bits
Drill bits can break while working on hard stones. Stop drilling immediately to avoid more damage. Remove the broken piece carefully using pliers or tweezers. Use a new, sharp bit for better results. Always use the right bit type for the stone you are drilling.
Fixing Chipped Stones
Chipping can occur around the hole edges. Use fine sandpaper or a small file to smooth the chips gently. Work slowly to avoid making the chip worse. Wet the stone while sanding to reduce dust and heat. This keeps the stone safe and prevents further damage.
Improving Hole Accuracy
Accurate holes make jewelry look professional. Mark the drilling spot with a pencil or tape for better guidance. Use a drill press or steady hand to keep the bit straight. Drill slowly and apply light pressure to avoid slipping. Check the hole depth often to prevent over-drilling.
Credit: eternaltools.com
Frequently Asked Questions
What Tools Are Needed To Drill Stones For Jewelry?
You need a rotary tool, diamond drill bits, water source, and safety gear. These tools ensure precision and prevent stone damage while drilling.
How To Prevent Stones From Cracking While Drilling?
Use water as a coolant to reduce heat. Drill slowly with light pressure to avoid cracks and fractures in the stone.
Which Stones Are Best For Jewelry Drilling?
Soft to medium-hard stones like turquoise, jasper, and agate work well. Avoid very hard or brittle stones to reduce breakage risk.
How To Choose The Right Drill Bit Size?
Select a drill bit slightly smaller than the hole needed. This allows for precise drilling without damaging the stone.
Conclusion
Drilling stones for jewelry takes care and patience. Use the right tools and steady hands. Always protect your stone and wear safety gear. Start with small holes and go slow. Practice on cheap stones before working on valuable ones. Enjoy the process and create unique pieces.
Keep your workspace clean and organized. With time, your skills will improve naturally. Jewelry making can be fun and rewarding. Give it a try and see what you make!