
Drilling into tile can feel like a risky task. One wrong move, and your beautiful tile could crack or shatter.
If you’ve ever worried about ruining your wall or floor while trying to hang shelves, hooks, or fixtures, you’re not alone. But here’s the good news: with the right tools and techniques, you can drill through tile safely and confidently.
Keep reading, and you’ll discover simple steps that protect your tile and make your project smooth and stress-free. Your next DIY task just got a whole lot easier.
Choosing The Right Tools
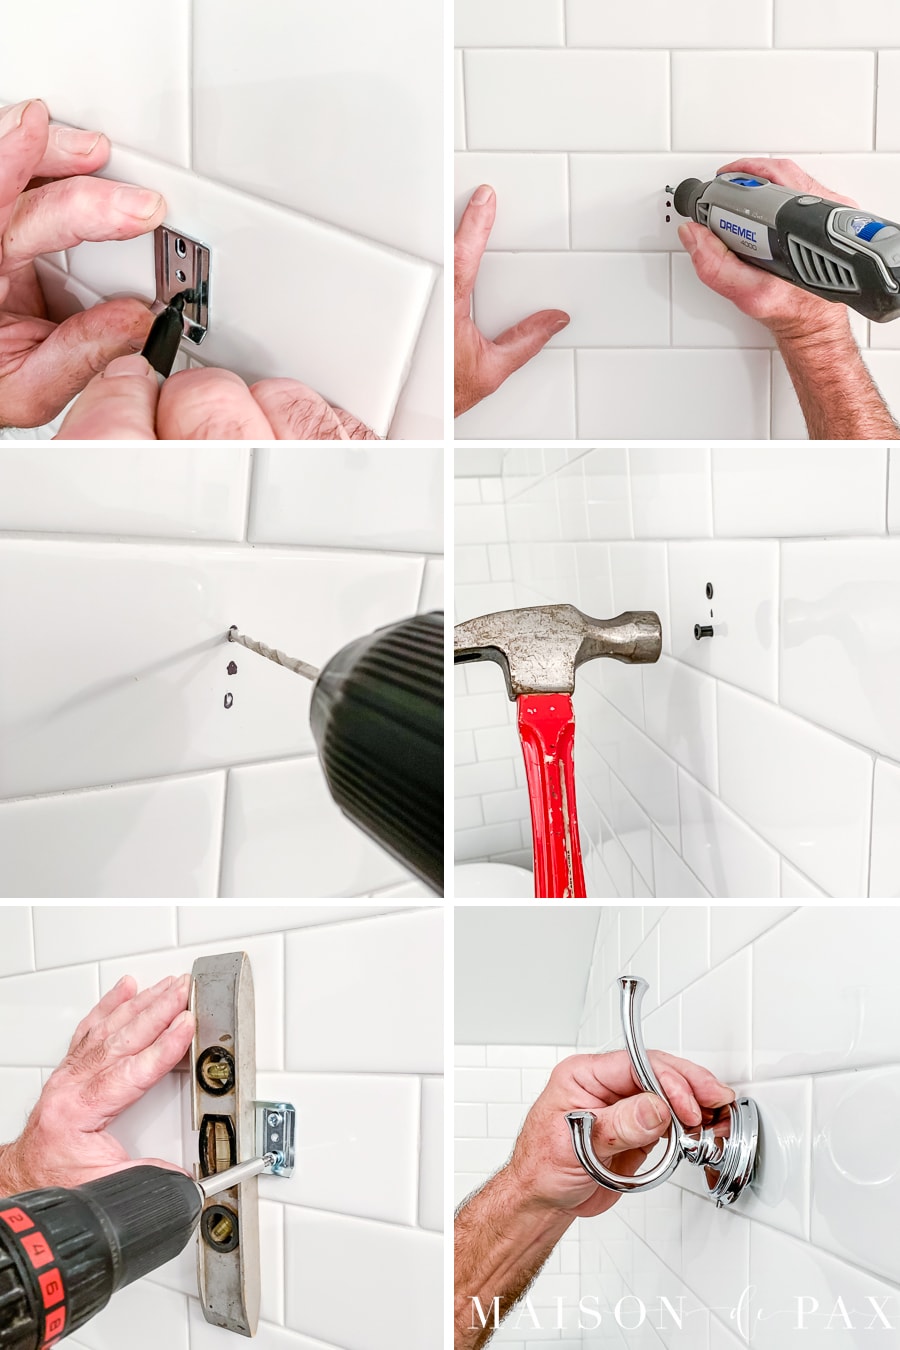
Choosing the right tools is key to drilling tile without cracking it. The proper tools make the job easier and safer. Using the wrong tools can cause damage to your tiles and waste time. Select tools designed for tile work to get clean holes and avoid breaks.
Focus on drill bits made for hard, smooth surfaces. Also, wear safety gear to protect yourself from dust and shards. Let’s explore the best drill bits for tiles and the essential safety gear you need.
Best Drill Bits For Tiles
Use carbide-tipped or diamond-tipped drill bits for tiles. These bits cut through tile without chipping. Standard bits can slip and crack the tile surface. Start with a small bit to make a pilot hole. Then, use the correct size bit for the final hole. Keep the drill speed slow to avoid heat build-up. Water can cool the drill bit and tile. This prevents cracks and extends bit life.
Essential Safety Gear
Wear safety goggles to protect your eyes from flying shards. Use a dust mask to avoid breathing in tile dust. Gloves protect your hands from sharp edges and hot drill bits. Ear protection reduces noise from the drill. Safety gear keeps you safe and comfortable during the job.
Credit: www.maisondepax.com
Preparing The Tile Surface
Preparing the tile surface is the first step to drill without cracking it. Careful preparation helps protect the tile and keeps the drill bit steady. This step makes drilling safer and easier.
Start by cleaning the tile well. Dirt or dust can cause the drill to slip. Marking the exact spots to drill is also important. Clear marks guide the drill bit and prevent mistakes.
Cleaning And Marking Drill Spots
Clean the tile surface with a soft cloth and mild cleaner. Remove all dust and grease. Dry the tile completely before marking. Use a pencil or marker to make small dots where you want to drill. These dots show the exact drilling points. Clear marks help keep the drill bit steady and avoid slipping.
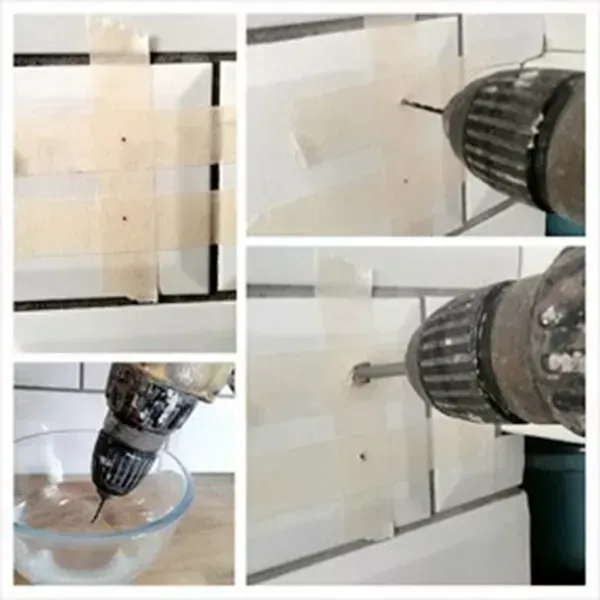
Using Tape To Prevent Slipping
Place a piece of masking or painter’s tape over the drill spot. The tape adds grip for the drill bit. It prevents slipping and reduces tile damage. Press the tape flat against the tile. Mark the drill point again on the tape. This extra step stabilizes the drill and protects the tile surface.
Drilling Techniques For Tiles
Drilling tiles needs care and the right methods. Tiles are hard but can crack easily if drilled wrong. Using proper techniques helps keep tiles intact. This section covers key tips for drilling tiles safely.
Setting The Correct Drill Speed
Choose a slow drill speed to protect tiles. High speed causes heat and pressure, leading to cracks. Start drilling at low speed and keep it steady. This helps control the drill and avoid damage.
Applying Steady Pressure
Press gently but firmly on the drill. Too much force breaks tiles. Too little pressure wastes time and can slip. Keep your hand steady and let the drill do the work. Consistent pressure prevents cracks and keeps holes clean.
Cooling The Drill Bit
Heat weakens tiles and dulls the drill bit. Use water or a damp cloth to cool the bit. Stop drilling sometimes to cool the area. Cooling lowers risk of cracks and extends the drill bit’s life.

Credit: www.youtube.com
Handling Different Tile Types
Different tile types need different care when drilling. Each tile has its own hardness and fragility. Knowing how to handle each tile helps prevent cracks and damage. Use the right tools and techniques for a smooth job.
Drilling Ceramic Tiles
Ceramic tiles are common and easier to drill. Use a carbide-tipped drill bit for best results. Start with a small hole to guide the drill. Drill slowly and apply light pressure. Keep the drill steady to avoid slipping.
Drilling Porcelain Tiles
Porcelain tiles are denser and harder than ceramic. Use a diamond-tipped drill bit for better cutting. Begin with a slow speed to protect the tile. Do not push too hard; let the drill do the work. Keep the drill bit cool with water to prevent overheating.
Drilling Glass Tiles
Glass tiles are very fragile and need extra care. Use a diamond-coated drill bit designed for glass. Place masking tape over the spot to avoid slipping. Drill slowly and gently with little pressure. Water helps keep the tile cool and reduces dust.
Troubleshooting Common Issues
Drilling tile can be tricky. Cracks and slips often happen, causing frustration. Knowing how to fix these problems saves time and effort. This section covers common troubles and simple fixes. You will learn ways to protect your tile and keep your drill steady.
Avoiding Cracks And Chips
Start by using the right drill bit. Diamond or carbide bits work best for tiles. Place a piece of tape on the spot to stop slipping. Drill slowly and apply light pressure. Let the drill do the work. Avoid pushing hard or drilling too fast. Cool the bit with water to reduce heat. Heat can crack the tile easily. Take breaks to keep everything cool. This method helps keep tiles intact and smooth.
Dealing With Slipped Drill Bits
Slipped bits cause uneven holes and scratches. To stop slipping, mark the spot with a pencil and tape. Use a center punch or nail to make a small dent. This dent guides the drill bit. Hold the drill steady and start at low speed. Avoid sudden movements. If the bit slips, stop and reposition carefully. A steady hand improves accuracy and prevents damage. Practice on spare tiles to gain confidence.
Credit: www.tilewizards.com.au
Post-drilling Care
Taking care of your tile after drilling is very important. Proper post-drilling care keeps the tile strong and looking good. It also stops dirt and moisture from causing damage later. Follow these simple steps to protect your tile after drilling.
Cleaning Drill Holes
Remove dust and debris from the holes carefully. Use a small brush or a vacuum to clean inside. Avoid using water right away, as it may weaken the tile. Make sure the holes are dry before moving to the next step. Clean holes help any sealant stick better and last longer.
Sealing And Finishing
Apply a good quality sealant inside the drill holes. Sealants protect the tile from water and dirt. Use a small brush or a dropper for precise application. Let the sealant dry fully before using the tile or wall. Sealing keeps the holes strong and prevents cracks from forming.
Frequently Asked Questions
How Do I Prevent Tile Cracking When Drilling?
Use a carbide-tipped drill bit and start with a small pilot hole. Apply gentle pressure and drill slowly. Place masking tape over the drilling spot for extra grip and to reduce slippage.
What Drill Bit Is Best For Drilling Tiles?
A diamond or carbide-tipped drill bit is best. These bits cut through hard surfaces like ceramic or porcelain tiles without causing cracks or damage.
Should I Wet The Tile While Drilling?
Yes, wetting the tile cools the drill bit and reduces friction. This helps prevent overheating, which can cause the tile to crack or the bit to dull quickly.
Can I Drill Tiles With A Regular Drill?
You can, but use a low speed and the right drill bit. Avoid high pressure and ensure the bit is designed for tiles to prevent cracking.
Conclusion
Drilling tile without cracking takes care and the right tools. Use a drill bit made for tile and go slow. Apply gentle pressure and keep the drill steady. Cooling the drill bit with water helps prevent cracks. Mark your spot clearly before you start drilling.
These simple steps protect your tile and make your work easier. Practice on a spare tile if possible. With patience and care, you can drill tiles safely and neatly every time.