
Are you tired of struggling to drill perfect holes by hand? Imagine having a reliable drill press right in your own workshop—one that you built yourself.
Making a homemade drill press might sound complicated, but with the right steps, you can create a tool that saves you time and improves your projects. In this guide, you’ll discover simple, clear instructions to build your own drill press without breaking the bank.
Ready to take your DIY skills to the next level? Keep reading, and let’s get started.
Materials And Tools Needed
Building a homemade drill press starts with gathering the right materials and tools. These items ensure the project goes smoothly. Having everything ready saves time and avoids frustration.
The list below covers basic items anyone can find easily. These are common parts and tools for simple workshop projects.
Materials Needed
- Electric drill (cordless or corded)
- Wooden board or metal plate for the base
- Metal pipe or square tubing for the column
- Wood or metal piece for the drill holder
- Screws, nuts, and bolts for assembly
- Washers to secure parts tightly
- Spring for tension (optional)
- Wood glue or strong adhesive (optional)
Tools Needed
- Drill bits suitable for wood or metal
- Screwdriver set (flat and Phillips)
- Wrench or spanner for tightening bolts
- Measuring tape or ruler
- Marker or pencil for marking
- Clamps to hold pieces during assembly
- Hacksaw or metal cutter for pipe
- Sandpaper to smooth rough edges
Choosing The Right Base
Choosing the right base is key to building a solid homemade drill press. The base holds the entire tool steady and safe during use. A strong base prevents wobbling and ensures accurate drilling. Picking a poor base can cause problems like vibration or misalignment.
This section guides you through the best base options. It helps you decide on materials and size. A well-chosen base supports your work and improves results.
Material Options For The Base
Wood is easy to find and work with. It absorbs some vibration but may wear down over time. Metal bases provide more strength and last longer. Steel or aluminum works best for heavy-duty use. Concrete bases are very stable but hard to move.
Size And Weight Considerations
The base must be wide enough to stop tipping. A bigger base spreads the force of drilling evenly. Heavy bases give the best stability but can be hard to carry. Balance size and weight based on your workspace.
Surface Flatness And Stability
Flat surfaces keep the drill press steady and precise. Check the base for any bumps or uneven spots. Sand or plane the surface if needed. Stability improves safety and helps you drill straight holes.
Mounting Options And Fixing The Drill
The base should have holes or slots to fix the drill. Bolting the drill press to the base stops movement. Choose a base that matches your drill’s mounting points. Secure fixing improves control and drilling accuracy.
Building The Drill Press Column
The drill press column is the backbone of your homemade drill press. It holds the head and base together firmly. A strong column ensures stability and accuracy during drilling. Building this part correctly is important for safety and performance.
Choose a metal pipe or a thick wooden post for the column. Metal pipes are durable and resist bending. Wooden posts can work but must be straight and strong. The column should be tall enough to allow drilling large materials.
Choosing The Right Material
Metal pipes like steel or aluminum are best for the column. They offer good strength and last longer. If you use wood, pick hardwood like oak or maple. Avoid softwoods as they can warp or crack easily.
Cutting And Preparing The Column
Measure the height needed based on your drill press size. Cut the column material cleanly using a saw or pipe cutter. Smooth the edges with sandpaper or a file to avoid injury. Check the column for straightness before assembly.
Attaching The Column To The Base
Drill holes in the base to fit the column securely. Use bolts or screws to fix the column in place. Tighten fasteners to prevent any wobble. The base and column connection must be stable for safe use.
Mounting The Drill Head On The Column
Slide the drill head onto the column. Use clamps or brackets to hold it at the right height. Ensure the head moves smoothly up and down. Lock it securely to maintain the drilling position.
Credit: www.diymontreal.com
Assembling The Drill Head
Assembling the drill head is a key step in building your homemade drill press. This part holds the motor and the drill bit, so it must be strong and steady. Proper assembly ensures smooth and safe drilling. Focus on fitting the motor and chuck correctly for best results.
Mounting The Drill Motor
Start by choosing a suitable drill motor. A cordless drill or old power drill works well. Secure the motor to the drill press frame using brackets or clamps. Make sure the motor is tight and does not move. Align the motor shaft with the drill press spindle for straight drilling.
Use screws or bolts to hold the motor firmly. Avoid gaps or loose parts. Check the motor’s position so it can move up and down smoothly. This step helps keep the drill stable and accurate.
Attaching The Chuck
The chuck holds the drill bit in place. Attach it to the motor shaft carefully. First, clean the shaft and chuck to remove dirt and oil. Slide the chuck onto the shaft and tighten it securely.
Use a chuck key if needed to ensure a tight fit. The chuck must not wobble or slip during use. Test by spinning the chuck by hand. Adjust if it feels loose or uneven. A well-attached chuck improves drilling precision and safety.
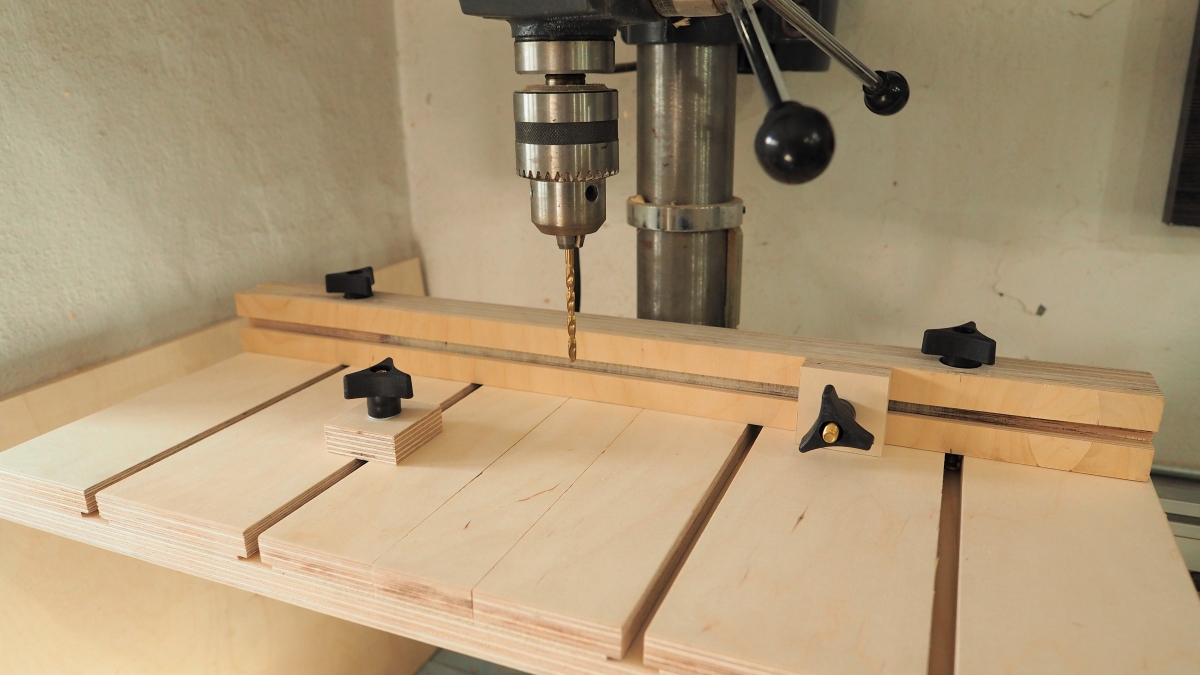
Constructing The Adjustable Table
Constructing the adjustable table is a key step in building a homemade drill press. This table holds the workpiece steady and lets you move it up or down. Making it adjustable gives you control over drilling depth and angle.
Use strong materials like plywood or metal for the table surface. It must be flat and sturdy to support different projects. The table also needs a system to move smoothly and lock in place.
Choosing The Right Material For The Table Surface
Select plywood or metal sheets for the table top. Plywood is easy to cut and light. Metal lasts longer and resists wear better. Pick what fits your tools and skills.
Building A Stable Support Frame
Create a frame from wood or metal bars. The frame holds the table steady. Ensure the frame fits your drill press base. Check the frame for any wobble before moving on.
Installing The Height Adjustment Mechanism
Use a threaded rod or rack and pinion for height control. Attach the rod to the frame and table. Turn the rod to raise or lower the table. Add a handle or knob for easy turning.
Adding A Locking System For Safety
Install a locking lever or screw to fix table height. This prevents the table from shifting during work. Test the lock to make sure it holds tight. Safety comes first with every homemade tool.
Credit: hackaday.com
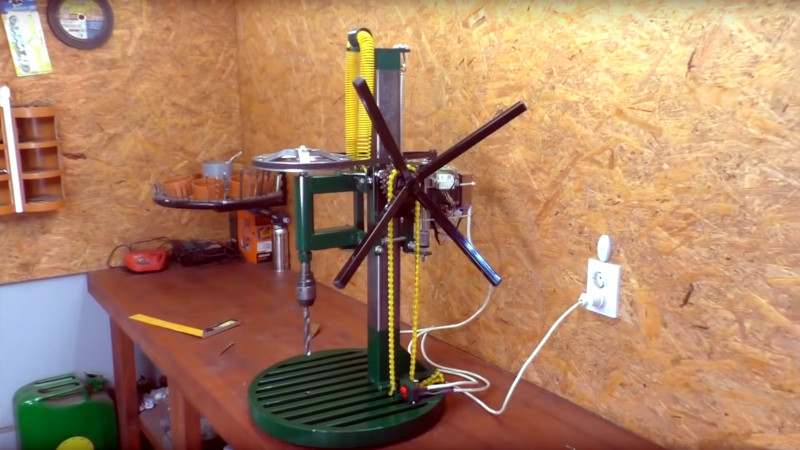
Installing The Feed Mechanism
Installing the feed mechanism is a key step in building a homemade drill press. It controls the drill’s up and down movement. A well-installed feed mechanism makes drilling safer and more accurate. This section explains how to set up the lever design and spring tension for smooth operation.
Lever Design
The lever moves the drill bit down into the material. Use a strong metal rod or pipe for the lever arm. Attach the lever to the drill press frame with a pivot bolt. The lever should move freely but stay firm. Add a handle at the end for better grip. Make sure the lever length fits your workspace. A longer lever gives more control and less effort.
Spring Tension Setup
The spring pulls the lever back up after drilling. Choose a spring with enough force to lift the drill bit smoothly. Attach one end of the spring to the lever. Fix the other end to a stable point on the frame. Adjust the spring position to balance the lever weight. The spring should return the lever without jerking. Test the tension by moving the lever several times. Change the spring or its position if needed for smooth motion.
Wiring And Safety Measures
Wiring and safety are key parts of making a homemade drill press. Proper wiring ensures the drill runs smoothly and avoids electrical problems. Safety measures protect you from accidents and injuries while using the drill press.
Take your time with wiring. Use the right wires and connections. Check every part to avoid shorts or sparks. Safety should never be ignored when working with electricity and power tools.
Proper Wiring Setup
Start by choosing wires that match your drill’s power needs. Use insulated wires to prevent shocks. Connect wires firmly to avoid loose contacts. Use a switch to control power easily. Label wires for easy identification later. Test the wiring with a multimeter before use.
Grounding The Drill Press
Grounding stops electrical shocks. Attach a ground wire from the drill press to a metal rod or grounded outlet. Check grounding connections regularly. Do not skip grounding; it is critical for safety.
Installing Safety Switches
Install an emergency stop switch near the drill. This switch cuts power instantly in danger. Use a switch that is easy to reach and operate. Make sure the switch works before every use.
Using Protective Covers
Cover all moving parts and wires. Use plastic or metal shields to block contact. These covers stop accidental touches and flying debris. Secure covers tightly to avoid shifting during use.
Regular Safety Checks
Inspect wiring and safety parts before each use. Look for worn wires or loose connections. Test all switches and emergency stops. Replace damaged parts immediately to keep safe.

Credit: www.youtube.com
Testing And Calibration
Testing and calibration are key steps after building a homemade drill press. These steps ensure your drill press works safely and accurately. Without testing, the drill may not drill straight or could be unsafe to use.
Calibration checks make sure the drill bit is aligned correctly. Testing verifies that the drill press spins smoothly and holds the workpiece firmly. Both are essential for good results and user safety.
Checking Drill Bit Alignment
Start by placing a drill bit in the chuck. Lower the bit to a flat surface like a metal plate. Observe if the bit touches the surface evenly without wobbling. If it wobbles, adjust the chuck or spindle until the bit runs straight.
Use a square tool to check if the drill bit is perpendicular to the table. Proper alignment means the bit should be exactly vertical. This prevents angled holes and improves drilling precision.
Testing Spindle Rotation
Turn on the drill press at low speed. Watch the spindle for any shaking or unusual noise. Smooth rotation means the bearings and motor work well. Fix any vibration by tightening parts or checking for loose components.
Spin the spindle by hand if the motor is off. It should rotate freely without resistance. If it feels tight, inspect the bearings and lubricate if needed.
Verifying Table Stability
Press down on the drill press table with your hands. The table should not move or wobble. A stable table keeps the workpiece steady during drilling. Tighten bolts or supports if the table shifts.
Check the locking mechanism that holds the table in place. It must secure the table firmly at different heights. Loose locks can cause dangerous slips while drilling.
Tips For Maintenance And Upgrades
Keeping your homemade drill press in good shape helps it last longer and work better. Regular care stops parts from wearing out fast. Small upgrades can improve safety and precision. Simple steps make a big difference.
Focus on cleaning, lubrication, and checking bolts often. These actions prevent damage and keep the drill press steady. Upgrades like better clamps or a stronger motor boost performance. Follow these tips to enjoy smooth and safe drilling every time.
Cleaning And Lubrication
Clean the drill press after each use. Remove dust, metal shavings, and oil. Wipe down the table and moving parts with a dry cloth. Use light machine oil on the spindle and gears. This reduces friction and wear. Avoid too much oil to prevent dirt buildup.
Checking And Tightening Bolts
Loose bolts cause wobbling and unsafe use. Check all bolts every month. Tighten any that feel loose with the right wrench. Pay special attention to the base and motor mount bolts. Secure parts keep the drill press steady and accurate.
Upgrading Clamps And Safety Features
Better clamps hold workpieces firmly. Replace old clamps with strong, adjustable ones. Add safety guards around the drill bit. This prevents injuries from flying debris. Install a switch with an emergency stop button. These upgrades protect you and improve control.
Improving Motor And Speed Control
Upgrade the motor for more power and smooth operation. Use a motor with adjustable speed settings. This lets you match the speed to different materials. Adding a variable speed control switch is helpful. It increases the drill press’s versatility and efficiency.
Frequently Asked Questions
What Materials Are Needed To Build A Homemade Drill Press?
You need a motor, drill chuck, metal frame, pulley system, and switches. Quality materials ensure stability and safety during use.
How Do I Ensure Accuracy When Making A Drill Press?
Use a square and level to align the drill bit perfectly. Secure all parts tightly to avoid wobbling during operation.
Can I Use An Old Power Drill For The Drill Press?
Yes, an old power drill can work as the motor. Ensure it fits securely and runs smoothly for best results.
How Do I Adjust The Drill Press Speed At Home?
Use a pulley system or variable speed controller to adjust RPM. This helps drill different materials effectively and safely.
Conclusion
Building a homemade drill press saves money and adds value to your workshop. The steps are simple and easy to follow. You only need basic tools and materials to get started. This project helps you understand how drill presses work.
Plus, you can fix or improve it anytime. Try making one to enjoy precise drilling at home. It’s a smart way to boost your DIY skills. Give it a shot and see the difference yourself.