
If your Makita cordless drill isn’t running as smoothly as before, the problem might be worn-out brushes. Knowing how to change brushes on your Makita drill can save you time and money by keeping your tool in top shape.
In this guide, you’ll discover simple, step-by-step instructions that anyone can follow—even if you’ve never done it before. By the end, you’ll feel confident fixing your drill yourself, avoiding costly repairs and downtime. Ready to get your drill back to full power?
Let’s dive in.
Tools Needed
Changing brushes on a Makita cordless drill needs the right tools. Having these tools ready makes the job easier and safer. Prepare everything before starting to save time and avoid mistakes.
Essential Tools
You will need a small screwdriver, usually a Phillips head. It helps remove the drill’s cover. A pair of needle-nose pliers is useful to pull out the brushes gently. A replacement brush set made for your Makita drill is necessary. Keep a clean cloth nearby to wipe dust and debris. A small flashlight can help see inside the drill clearly.
Safety Gear
Wear safety glasses to protect your eyes from dust and small particles. Use gloves to protect your hands from sharp edges. Make sure your workspace is clean and well-lit. Avoid loose clothing or jewelry that can get caught in the drill. Safety gear keeps you safe and comfortable during the task.
Credit: www.topdealsonline.shop
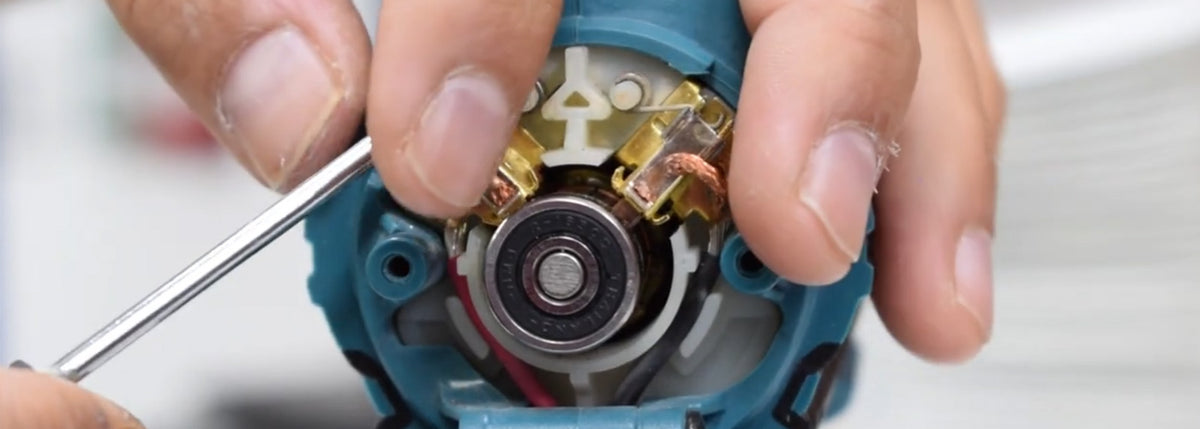
Locating The Brushes
Finding the brushes in your Makita cordless drill is the first step to replacing them. Brushes are small parts that help the motor run smoothly. Knowing where these parts are saves time and avoids damage.
Accessing The Brush Compartment
The brush compartment is usually near the back of the drill’s motor. Remove the battery first for safety. Look for small caps or covers on each side of the drill. Use a screwdriver to open these caps carefully. Inside, you will see the brushes attached to springs. Handle them gently to avoid breaking the springs.
Identifying Brush Types
Brushes come in different sizes and shapes. Check the exact shape and size of your drill’s brushes before buying new ones. Carbon brushes are common in Makita drills. They wear down over time and need replacement. Match the new brushes with the old ones for a perfect fit. Using the wrong type may harm your drill’s motor.
Removing Old Brushes
Removing old brushes from your Makita cordless drill is the first step in brush replacement. This process helps maintain your drill’s performance and extends its life. Old brushes wear out and reduce power. Removing them carefully prevents damage to the drill’s motor.
Steps To Detach Brushes
First, unplug the drill or remove its battery for safety. Locate the brush caps on the sides of the drill’s motor housing. Use a small screwdriver to unscrew the brush caps gently. Pull out the brush holder with the brush inside. If the brush is stuck, wiggle it lightly to loosen. Take out the old brush completely. Check the brush size and shape for the replacement match.
Handling Brush Springs
Brush springs keep the brushes pressed against the motor’s commutator. Carefully remove the springs along with the brushes. Avoid stretching or damaging the springs. Note how the springs fit inside the brush holder. This helps when installing new brushes. Keep springs clean and free from dirt or rust. Replace springs if they look weak or damaged.
Installing New Brushes
Installing new brushes on your Makita cordless drill is a key step to keep it running smoothly. Brushes wear down over time and need replacing to maintain power and efficiency. This process is simple but requires care and attention.
Follow these steps to insert and secure the new brushes correctly. Proper installation ensures your drill works well and lasts longer.
Inserting Replacement Brushes
First, remove the old brushes carefully. Clean the brush holders to remove dust and debris. Take the new brushes and align them with the holder slots. Gently slide the brushes into place. Make sure they fit snugly without forcing them. Proper alignment helps the brushes contact the motor correctly.
Securing Brushes Properly
Next, secure the brushes using the spring clips or screws provided. Check that the brushes move slightly but stay firmly in place. Avoid overtightening, which can damage the brushes or holder. Test the brush movement to confirm good contact with the motor. Proper securing prevents sparks and improves drill performance.
Testing The Drill
Testing the drill after changing the brushes is important. It confirms the tool works well and safely. This step helps spot any problems early. Take your time to check the drill carefully. It ensures the repair was successful.
Ensuring Proper Function
First, insert the battery securely. Turn on the drill at low speed. Listen for smooth, even sounds. Watch the drill bit for steady movement. Check the drill does not overheat quickly. Feel the handle for unusual vibrations. All these signs show the drill works properly.
Troubleshooting Common Issues
If the drill does not start, check the battery charge. Clean the brush contacts and motor area. Make sure the brushes fit tightly in place. Look for sparks or burning smells. These indicate poor brush contact. Replace brushes again if needed. If problems persist, consider professional help.

Credit: www.youtube.com
Maintenance Tips
Maintaining your Makita cordless drill is key to its long life. Proper care helps the brushes last longer and keeps the drill running smoothly. Follow simple steps to avoid frequent brush replacements and ensure steady power.
Extending Brush Life
Use the drill at moderate speeds to reduce wear on brushes. Avoid pushing too hard during drilling. Let the drill do the work. Keep the drill clean and free from dust. Dust can cause brushes to wear out faster. Store the drill in a dry place to prevent moisture damage. Use the right drill bits and avoid overloading the motor. These small habits save brush life.
Regular Inspection
Check the brushes every few months. Remove the brush caps and look for signs of wear. Replace brushes if they are less than 1/4 inch thick. Listen for unusual noises during operation. Grinding or sparking sounds can signal worn brushes. Inspect the brush springs for proper tension. Loose springs reduce contact and cause damage. Routine checks prevent sudden drill failure and costly repairs.

Credit: www.topdealsonline.shop
Frequently Asked Questions
How Do I Know When To Change Makita Drill Brushes?
You should change brushes when the drill slows or sputters. Worn brushes cause poor performance and overheating. Regular inspection helps maintain efficiency and extends drill life.
What Tools Are Needed To Replace Makita Drill Brushes?
You typically need a screwdriver and replacement brushes. Some models require a small wrench. Always use manufacturer-approved brushes for best results.
Is It Safe To Change Brushes On A Cordless Drill?
Yes, but always remove the battery first. This prevents accidental starts. Follow the user manual’s safety instructions carefully to avoid injury.
How Often Should I Replace Brushes On A Makita Drill?
Brushes usually last 6-12 months depending on usage. Frequent heavy use may require earlier replacement. Regular checks ensure optimal drill performance.
Conclusion
Changing brushes on your Makita cordless drill keeps it working well. Follow the steps carefully to avoid damage or injury. Use the right tools and take your time. Regular brush checks help extend your drill’s life. A well-maintained drill saves money and works better.
Practice these simple steps to feel more confident. Your drill will run smoothly with fresh brushes installed. Ready to fix your drill? Start with safety and patience.