
Are you ready to tackle your next DIY project but unsure how to get started with your cordless drill? Knowing how to insert a drill bit correctly is the first step to making your work smooth and safe.
If you’ve ever felt stuck or worried about damaging your tool, this guide is made just for you. Keep reading, and you’ll learn an easy, step-by-step way to insert a drill bit into your cordless drill like a pro—no confusion, no mistakes.
Let’s make your drilling tasks quicker and more confident!
Choose The Right Drill Bit
Choosing the right drill bit is important for a smooth drilling job. The correct bit makes your work easier and protects your drill. Each project needs a different type of drill bit. Picking the right one helps you drill clean holes without damage.
Types Of Drill Bits
There are many types of drill bits. Twist bits are common for wood and metal. Masonry bits work well on brick and concrete. Spade bits create large holes in wood. For metal, use cobalt bits for strength. Each bit has a shape and tip for its job.
Matching Bit To Material
Match the drill bit to the material you drill. Wood bits cut wood cleanly and fast. Metal bits are harder and stay sharp longer. Masonry bits have a strong tip for stone. Using the wrong bit can break the bit or material. Check the material before picking a bit.
Credit: www.homedepot.com
Prepare The Cordless Drill
Preparing your cordless drill before inserting a drill bit is important. It ensures safety and smooth operation. Taking a few simple steps helps you work better and avoid damage.
Power Off And Safety
Always turn off the drill before changing the bit. Remove the battery if possible. This stops the drill from starting by mistake. Wear safety glasses to protect your eyes. Keep your hands dry and clean for a firm grip. Check the drill for any damage before use.
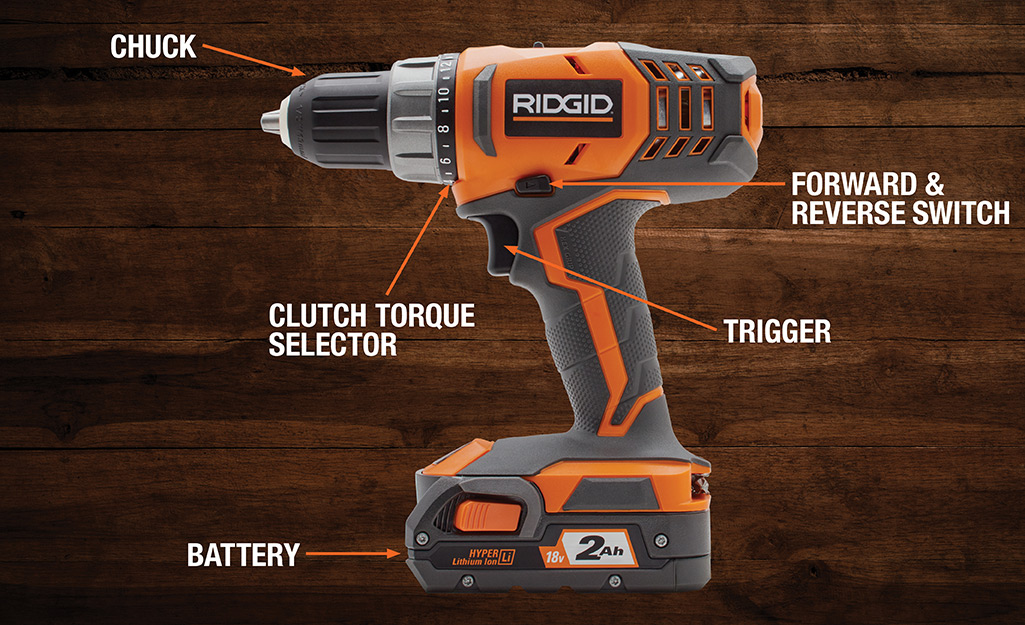
Check The Chuck Type
Look at the drill’s chuck to know its type. Some drills have a keyless chuck that you turn by hand. Others use a chuck key to tighten or loosen the bit. Knowing the chuck type makes bit insertion easier. Make sure the chuck is clean and free of dust or debris.
Open The Chuck
Opening the chuck is the first step to insert a drill bit into a cordless drill. The chuck holds the drill bit tightly while you work. It must be opened correctly to fit the drill bit. This process is simple once you understand the type of chuck your drill has.
Twist Or Key Mechanism
Most cordless drills use a twist chuck. You open it by turning the chuck counterclockwise. This loosens the jaws inside. Some older drills use a key mechanism. The key fits into holes on the chuck. Turn the key to open the jaws. Both methods allow the drill bit to fit in.
Adjusting The Chuck Size
After opening the chuck, adjust it to the drill bit size. Hold the chuck and turn it until the jaws open wide enough. Make sure the hole is bigger than the drill bit. Insert the bit straight into the chuck. Then, twist the chuck clockwise to tighten it. The drill bit should be secure and not wobble.
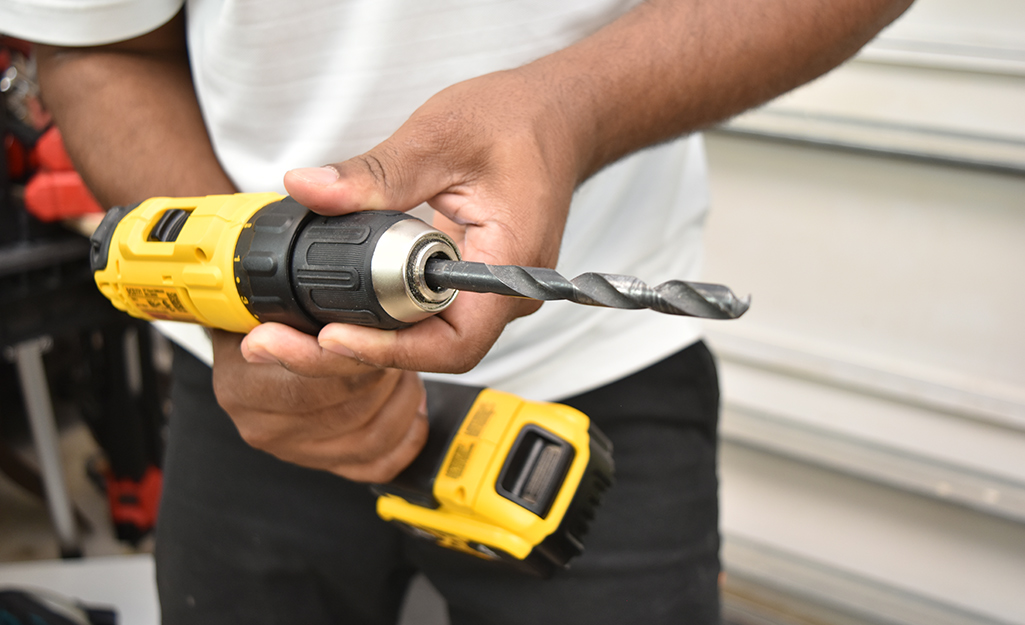
Insert The Drill Bit
Inserting a drill bit into a cordless drill is a simple but important step. This process ensures your drill works correctly and safely. Follow these steps to place the bit properly. It will help you get the job done with ease and accuracy.
Aligning The Bit
First, hold the drill bit near the drill chuck. The chuck is the round part at the drill’s front. Make sure the bit’s shank fits the chuck size. Line up the bit straight with the chuck opening. Avoid forcing the bit at an angle. Push the bit gently into the chuck until it stops.
Securing The Bit In Place
Next, tighten the chuck to hold the bit firmly. Some drills have a keyless chuck you twist by hand. Turn the chuck clockwise to secure the bit. Tighten it until the bit does not move. For drills with a chuck key, insert the key and turn it. Check the bit by pulling it lightly. It should stay in place without slipping.
Tighten The Chuck
Tightening the chuck is a key step in securing the drill bit in your cordless drill. It holds the bit firmly so it does not slip during use. A tight chuck ensures safety and better drilling accuracy. Follow simple steps to make sure the bit is locked in place properly.
Hand-tightening Tips
Start by gripping the drill’s chuck with your hand. Turn the chuck clockwise to tighten it around the drill bit. Keep turning until you feel strong resistance. Do not overtighten or force it too much. A snug fit is enough to hold the bit securely. Test the bit by pulling it gently to check if it moves.
Using A Chuck Key If Needed
Some cordless drills come with a chuck key for extra tightening power. Insert the chuck key into the hole on the chuck. Turn the key clockwise to tighten the chuck further. This tool helps especially with larger drill bits. Make sure the bit stays straight while tightening. Remove the chuck key before turning on the drill to avoid accidents.
Credit: www.homedepot.com
Test The Bit Installation
Testing the drill bit installation is crucial before starting any project. It ensures the bit is secure and ready for use. A loose bit can cause damage or injury. Follow simple steps to check the installation safely.
Powering On Safely
Hold the drill firmly with both hands. Keep the drill away from your body. Turn the drill on at the lowest speed. Listen for unusual sounds. Stop immediately if the drill sounds strange. This step prevents accidents and protects the tool.
Checking For Stability
Watch the drill bit as it spins. It should rotate straight without wobbling. A shaky bit means it is not tight enough. Tighten the chuck and test again. The bit must stay stable to work well and last longer.
Maintenance Tips
Maintaining your cordless drill helps it work better and last longer. Small care steps keep the tool ready for use. Clean parts and store bits well after use. This prevents damage and rust.
Cleaning The Chuck
The chuck holds the drill bit tightly. Dirt and dust can build up inside it. Use a dry cloth to wipe the chuck regularly. For tough dirt, a small brush works well. Avoid water or oil, which can cause rust. Check the chuck for wear or damage often. Clean chucks grip bits securely and prevent slipping.
Proper Storage Of Bits
Store drill bits in a dry place. Use a bit case or organizer to keep them neat. Keep bits separated to avoid dulling or bending. Avoid leaving bits loose in a toolbox. Proper storage stops rust and damage. It saves time by keeping bits easy to find.

Credit: www.youtube.com
Frequently Asked Questions
How Do I Insert A Drill Bit Into A Cordless Drill?
First, loosen the chuck by turning it counterclockwise. Insert the drill bit fully into the chuck. Then, tighten the chuck clockwise by hand or using the drill’s key. Ensure the bit is secure before use to prevent slipping during drilling.
What Type Of Drill Bit Fits A Cordless Drill?
Cordless drills commonly use twist drill bits with a cylindrical shank. Most chucks accept bits with a 1/4-inch or 3/8-inch shank diameter. Always check your drill’s specifications to choose the correct bit size and type for optimal performance.
Can I Insert A Drill Bit Without A Chuck Key?
Yes, many cordless drills have keyless chucks. You can tighten or loosen the chuck by hand. Simply hold the drill body, turn the chuck counterclockwise to loosen, insert the bit, then turn clockwise to tighten it securely.
How Tight Should The Drill Bit Be In The Chuck?
The drill bit should be tightly secured to avoid slipping. Tighten the chuck firmly by hand or with a key until the bit doesn’t move. Over-tightening is unnecessary and could damage the bit or chuck.
Conclusion
Inserting a drill bit into a cordless drill is simple and quick. Start by loosening the chuck, then place the bit inside firmly. Tighten the chuck to hold the bit securely. Always check that the bit is straight before use.
This helps you drill accurately and safely. Practice a few times to get comfortable with the steps. Soon, it will feel like second nature. Keep your drill bits clean and store them properly. This keeps your tools working well for a long time.
Now, you are ready to tackle your drilling projects with ease.