
Have you ever faced the frustration of your cordless drill suddenly losing power when you need it most? Your drill’s battery might seem like it’s beyond saving, but what if you could bring it back to life without spending money on a new one?
Imagine the satisfaction of fixing your own battery and getting your tools working like new again. You’ll discover whether you can repair cordless drill batteries, the simple steps you can take, and how to avoid common pitfalls. Keep reading—you might just save time, money, and a whole lot of hassle.
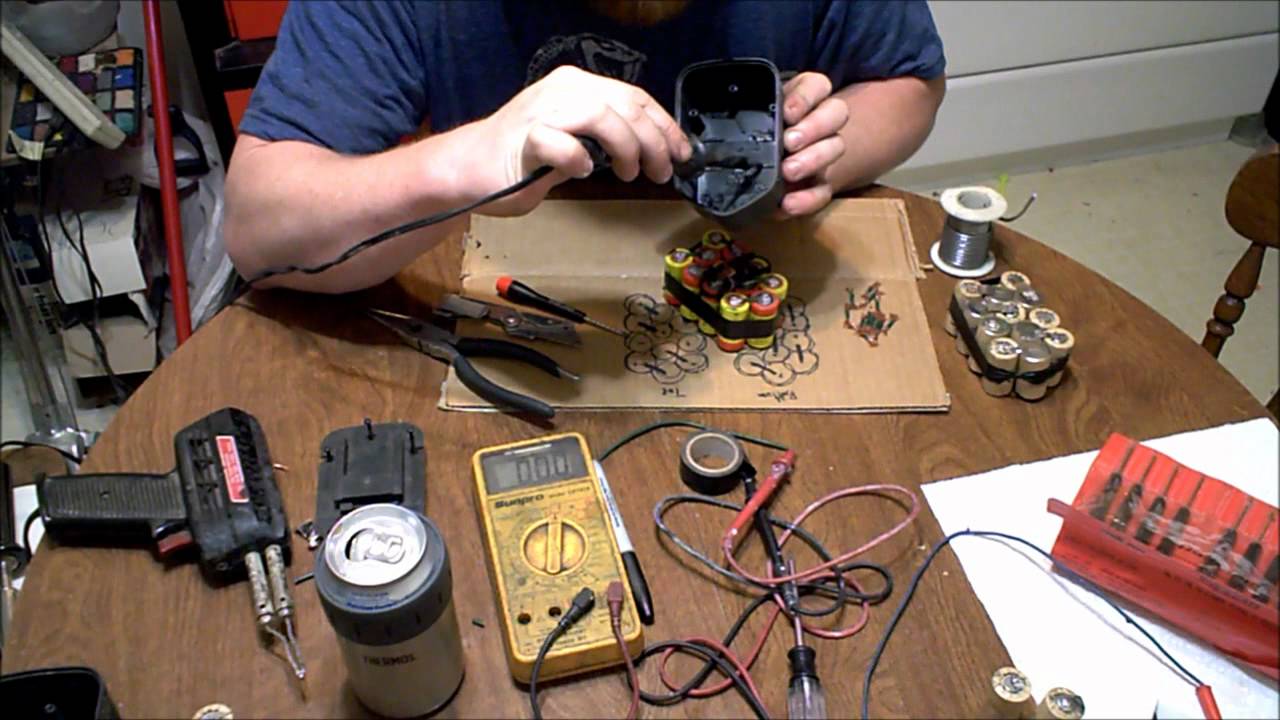
Credit: www.youtube.com
Signs Of A Failing Battery
Knowing the signs of a failing cordless drill battery helps you avoid sudden work stops. Batteries wear out over time and show clear signals. Recognizing these signs can save time and money by deciding if repair is needed.
Reduced Run Time
Your drill runs out of power much faster than before. The battery may only last half as long as it used to. This means you need frequent charging during tasks. Reduced run time is one of the first signs of a weak battery.
Inconsistent Power Output
The drill’s power changes while working. Sometimes it feels strong, other times weak or slow. This uneven power affects your work quality and speed. Inconsistent output often means the battery cells are damaged or worn out.
Overheating Issues
The battery or drill becomes hot during use or charging. Overheating can harm the battery further or cause safety risks. This problem often occurs because of internal damage or poor battery health. Watch for unusual heat as a warning sign.
Common Battery Types
Cordless drill batteries come in different types. Each type has unique features and common problems. Knowing the battery type helps in deciding if repair is possible. It also guides the repair process for better results.
Nickel-cadmium (nicd)
NiCd batteries were popular in older drills. They are durable and handle many charge cycles. These batteries suffer from memory effect. Memory effect means the battery loses full capacity if not fully discharged. Repair often involves cleaning terminals or replacing damaged cells. NiCd batteries contain toxic cadmium, so handle them with care.
Nickel-metal Hydride (nimh)
NiMH batteries replaced NiCd in many tools. They offer better capacity and less memory effect. NiMH batteries can overheat if overcharged. Repair usually means fixing connections or replacing weak cells. They are less toxic than NiCd but still need proper disposal. NiMH batteries last longer but may swell over time.
Lithium-ion (li-ion)
Li-ion batteries are common in modern cordless drills. They are light, have high capacity, and no memory effect. These batteries can fail due to overcharge or deep discharge. Repairing Li-ion batteries often requires special tools and skills. Damaged Li-ion cells can be dangerous if handled incorrectly. Replacing cells is a common repair method for Li-ion packs.
Tools Needed For Repair
Repairing cordless drill batteries needs the right tools. These tools help you check, fix, and safely handle battery parts. Without them, repair can be hard or unsafe. The tools also save time and make the process clear.
Basic Electronics Toolkit
A basic electronics toolkit is key for battery repair. It includes small screwdrivers, pliers, wire cutters, and tweezers. These tools help open the battery case and handle tiny parts. A soldering iron is also important to fix or replace damaged wires and cells.
Multimeter Usage
A multimeter checks voltage, current, and resistance in battery cells. It shows if cells work or need replacement. Learning to use a multimeter helps you find bad cells and measure battery health. This tool guides your repair decisions and prevents guesswork.
Safety Equipment
Safety comes first during battery repair. Wear safety glasses to protect your eyes from sparks. Use gloves to avoid chemical burns or electric shock. Work in a well-ventilated area to reduce harmful fumes. These safety steps protect you and keep the repair safe.

Credit: newportvessels.com
Step-by-step Battery Diagnosis
Diagnosing a cordless drill battery is the first step to repair it. You need to find out what exactly is wrong. This helps decide if the battery can be fixed or needs replacing. Follow these steps carefully for a clear diagnosis.
Removing The Battery Pack
Start by taking the battery pack out of the drill. This is usually simple and safe. Press the release buttons or latches on the battery. Pull the battery pack gently away from the drill. Handle it with care to avoid damage.
Checking Voltage Levels
Use a multimeter to measure the battery voltage. Set the multimeter to DC voltage mode. Touch the red probe to the positive terminal. Touch the black probe to the negative terminal. Read the voltage on the display. Compare it with the battery’s rated voltage. A much lower reading means the battery is weak or dead.
Identifying Faulty Cells
Open the battery pack carefully to access the cells. Check each cell’s voltage separately. Faulty cells show significantly lower voltage than others. Look for swollen or leaking cells as signs of damage. Replace only the bad cells for best results. This can restore battery performance and extend its life.
Diy Battery Fixes
DIY battery fixes can save money and extend your cordless drill’s life. Many common battery issues have simple solutions. You can fix or improve performance at home with basic tools. Understanding how batteries work helps you decide the best fix.
Cleaning Battery Contacts
Dirty contacts stop the battery from charging well. Use a soft cloth or fine sandpaper to clean the metal parts. Remove dust and corrosion gently. Clean contacts improve power flow and charging speed. Always disconnect the battery before cleaning for safety.
Reconditioning Nicd And Nimh Batteries
Nickel-Cadmium (NiCd) and Nickel-Metal Hydride (NiMH) batteries can lose capacity over time. Reconditioning helps restore some power. Fully charge the battery, then discharge it completely. Repeat this cycle several times. This process reduces memory effect and improves battery life.
Replacing Damaged Cells
Batteries contain multiple cells. A damaged cell lowers overall battery performance. Open the battery pack carefully to access cells. Test each cell with a voltmeter to find weak ones. Replace bad cells with matching new ones. Be cautious to avoid short circuits or damage.
Balancing Lithium-ion Packs
Lithium-ion packs need balanced charge levels across cells. Unbalanced cells can reduce battery life and safety. Use a battery management system (BMS) or balance charger. This device equalizes voltage in each cell. Balanced packs deliver consistent power and last longer.

Credit: www.youtube.com
Precautions And Safety Tips
Repairing cordless drill batteries can be useful but requires care. Safety is very important when handling batteries. Taking the right precautions helps avoid accidents and damage.
Some batteries, like lithium types, need special handling. Knowing how to work with these batteries safely protects you and your tools. Always follow safety steps strictly.
Handling Lithium Batteries Safely
Lithium batteries can catch fire if damaged. Avoid dropping or crushing these batteries. Use tools with insulated handles to prevent sparks. Work in a dry, well-ventilated area. Never expose lithium batteries to heat or open flames.
Avoiding Short Circuits
Short circuits cause sparks and can damage batteries. Do not touch battery terminals with metal objects. Keep batteries away from coins, keys, or tools. Cover terminals with tape before repair to prevent contact. Always disconnect batteries from the drill before starting work.
Proper Disposal Of Damaged Cells
Damaged battery cells are hazardous waste. Do not throw them in regular trash. Take them to a recycling center or hazardous waste facility. Place damaged batteries in a non-conductive container. Proper disposal protects the environment and people.
When To Replace Instead Of Repair
Knowing when to replace your cordless drill battery is key. Repairing might seem like a good idea, but it is not always the best choice. Some batteries have damage that cannot be fixed safely or well. Other times, repairing costs more than buying new. This section helps you see the signs and decide smartly.
Signs Of Irreparable Damage
Batteries that leak or swell need replacing. Cracks in the casing also show serious problems. If your battery won’t hold any charge after several attempts, it may be dead. Strange smells or overheating during charging are warning signs. These damages are unsafe and repair may fail.
Cost Vs. Benefit Analysis
Repair parts and labor can cost much. Sometimes the price of repair equals a new battery’s cost. New batteries often come with a warranty and better performance. Repair may only offer a short-term fix. Think about how long the battery will last after repair.
Environmental Considerations
Properly disposing of old batteries helps protect the environment. Recycling programs recover valuable materials and reduce waste. Using a new battery with better technology can be more eco-friendly. Avoid throwing batteries in the trash. Choose replacement to support safe recycling and reduce pollution.
Extending Battery Life
Extending the life of your cordless drill battery saves money and keeps your tool ready. Batteries wear out faster without good care. Simple steps can help your battery last longer and work better. These tips are easy to follow and make a big difference.
Proper Charging Habits
Charge the battery fully before using it. Avoid overcharging by removing it once fully charged. Use the charger made for your battery model only. Do not let the battery drain completely before charging. Frequent short charges keep the battery healthy.
Storage Tips
Store batteries in a cool, dry place. Avoid extreme heat or cold as it harms the battery. Keep batteries away from metal objects to prevent short circuits. Remove batteries from the drill if not used for a long time. Store batteries at about 40-60% charge for best results.
Regular Maintenance
Clean battery contacts with a dry cloth often. Check for cracks or damage before each use. Keep the battery vents clear of dust and debris. Test batteries regularly to spot performance issues early. Replace old or damaged batteries to avoid tool damage.
Frequently Asked Questions
Can Cordless Drill Batteries Be Repaired At Home?
Yes, many cordless drill batteries can be repaired at home by replacing damaged cells. Proper tools and safety precautions are essential. Repairing can extend battery life and save money compared to buying new ones.
What Causes Cordless Drill Batteries To Fail?
Cordless drill batteries often fail due to overcharging, deep discharge, or cell damage. Heat and age also reduce battery capacity. Proper storage and maintenance help prevent early failure.
How Long Does It Take To Repair A Drill Battery?
Repairing a drill battery typically takes 30 to 60 minutes. Time varies based on battery type and repair complexity. Preparing tools and following instructions speeds up the process.
Is It Safe To Repair Lithium-ion Drill Batteries?
Repairing lithium-ion batteries can be risky without experience. Incorrect handling may cause short circuits or fires. Always follow safety guidelines or seek professional help for lithium-ion battery repairs.
Conclusion
Repairing cordless drill batteries can save money and reduce waste. Many battery issues come from simple problems you can fix at home. Testing and replacing damaged cells often restores battery life. Always follow safety steps to avoid accidents during repair.
Some batteries may need full replacement if badly damaged. Knowing repair basics helps you decide when to fix or buy new. Taking care of batteries extends their useful life. A little effort can keep your drill working longer.