
If you own a Makita 6095D cordless drill, knowing how to take it apart can save you time and money. Whether you need to fix a small issue or replace a worn-out part, disassembling your drill yourself puts you in control.
In this guide, you’ll find simple, step-by-step instructions that make the process clear and easy. By the end, you’ll feel confident handling your drill like a pro. Ready to get started? Let’s dive in and unlock the secrets inside your Makita 6095D.
Tools Needed
Before starting to take apart the Makita 6095D cordless drill, gather the right tools. Using proper tools makes the job easier and safer. It helps avoid damage to the drill parts and ensures smooth disassembly.
Screwdrivers
You need both Phillips and flathead screwdrivers. The Phillips screwdriver fits the cross-shaped screws on the drill. The flathead screwdriver helps pry open parts gently. Choose screwdrivers with comfortable handles for better grip.
Hex Keys (allen Wrenches)
Hex keys are essential for loosening hex screws inside the drill. They come in different sizes, so have a small set handy. This tool fits hexagonal bolts tightly, preventing stripping.
Pliers
Use needle-nose pliers to hold small parts and wires. Regular pliers help pull out stubborn components. Pliers with insulated handles protect you from electric shocks.
Plastic Pry Tools
Plastic pry tools separate plastic parts without scratching. Metal tools can damage the drill’s casing, so plastic is safer. These tools help open snap-fit parts smoothly.
Cleaning Brush
A small brush removes dust and debris during disassembly. Keeping parts clean prevents dirt from causing problems later. Use a soft-bristle brush for delicate components.
Safety Precautions
Safety is the first step before starting to disassemble your Makita 6095D cordless drill. Taking precautions protects you and the tool from harm. It keeps the process smooth and trouble-free.
Follow these simple safety tips to avoid accidents and damage. Keep your workspace clean and well-lit. Handle parts carefully to prevent injury. Safety matters at every stage.
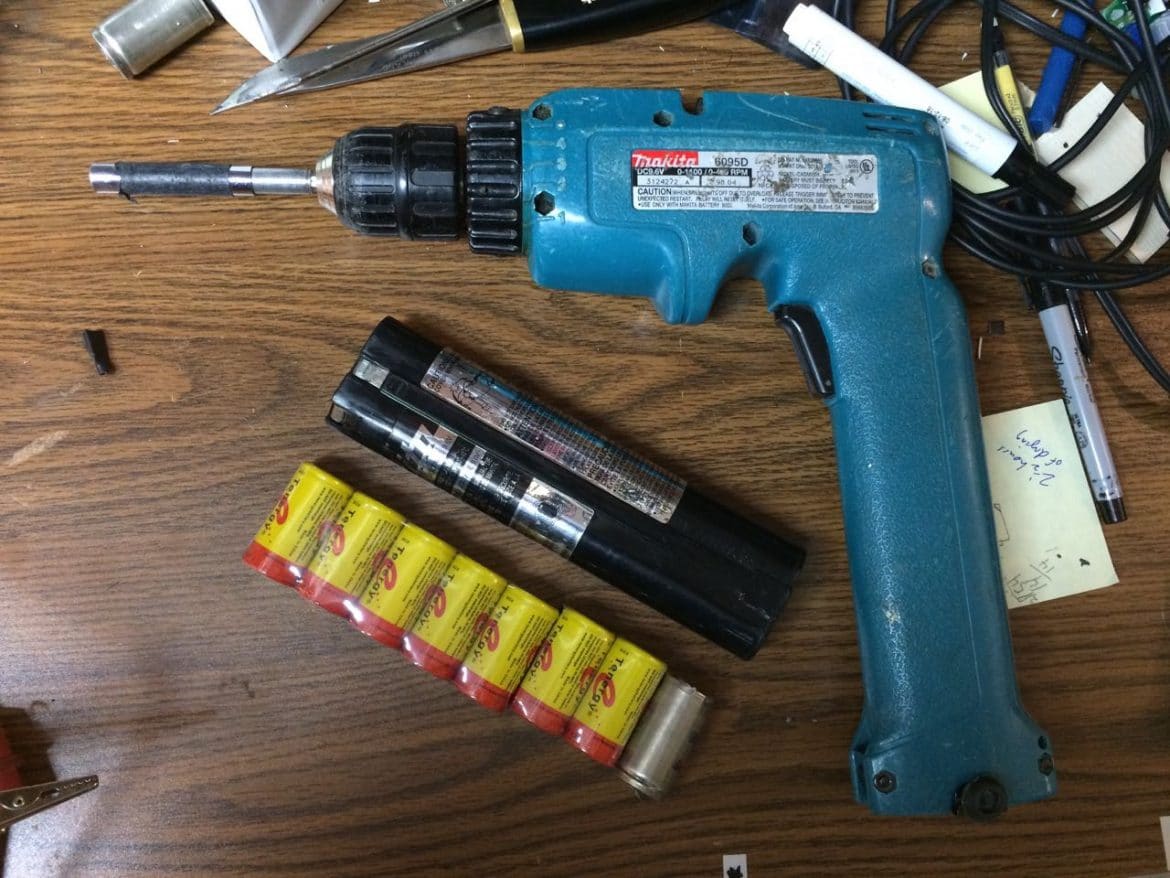
Remove The Battery
Always take out the battery before opening the drill. This stops any power flow. It prevents the drill from turning on by mistake. Removing the battery is a key safety step.
Wear Safety Gear
Put on safety glasses to protect your eyes. Use gloves to shield your hands from sharp edges. Proper gear lowers the risk of cuts and debris injuries.
Work In A Clean Area
Keep your workspace tidy and free of clutter. This avoids losing small parts. A clean area also reduces the chance of slips and falls.
Use The Right Tools
Choose tools that fit the screws and parts perfectly. Using wrong tools can strip screws or break pieces. Proper tools make disassembly safer and easier.
Follow Manufacturer Instructions
Read the Makita manual before starting. It offers important safety advice. Following the guide helps you avoid mistakes and hazards.
Removing The Battery
Start by pressing the release button on the Makita 6095D drill. Gently pull the battery out to avoid damage. Always remove the battery before disassembling the drill for safety.
Why Remove The Battery First?
Removing the battery is the safest first step. It stops the drill from turning on by mistake. This prevents accidents and protects the tool. Always remove the battery before starting any work on the drill.
Locate The Battery Release Button
Find the release button on the battery pack. It usually sits near the handle or base of the drill. This button holds the battery firmly in place. Pressing it unlocks the battery for removal.
How To Remove The Battery
Press the release button firmly. While holding the button, pull the battery away from the drill. The battery should slide out easily. Do not use too much force to avoid damage.
Store The Battery Safely
Place the battery in a dry, cool spot. Avoid areas with high heat or moisture. Proper storage keeps the battery healthy and ready to use next time.
Taking Off The Chuck
Taking off the chuck from the Makita 6095D cordless drill is a key step in disassembling the tool. The chuck holds the drill bit tightly and must be removed carefully to avoid damage. This process is simple and requires a few basic steps.
Prepare The Drill For Chuck Removal
First, remove the battery to prevent accidental starts. Place the drill on a stable surface. Clean the chuck area to see any screws or locks clearly.
Open The Chuck Jaws Fully
Turn the chuck sleeve to open the jaws wide. This loosens the grip on the drill bit. It also gives better access to the internal screw that holds the chuck.
Locate And Remove The Chuck Screw
Look inside the chuck for a small screw at the center. This screw holds the chuck tightly to the spindle. Use a screwdriver to turn it counterclockwise and remove it.
Unscrew The Chuck From The Spindle
Hold the drill firmly. Turn the chuck counterclockwise to unscrew it from the spindle. You may need a wrench or pliers for extra grip. Do this carefully to avoid slipping.
Inspect The Chuck And Spindle
After removal, check the chuck and spindle for dirt or damage. Clean them with a dry cloth. This keeps your drill in good working condition for reassembly.
Unscrewing The Outer Shell
Unscrewing the outer shell is the first important step to open your Makita 6095D cordless drill. The outer shell holds all parts together. Removing it carefully helps avoid damage to the drill’s inner components.
This step needs attention and patience. Use the right tools to prevent stripping screws or cracking plastic. Follow these simple steps to unscrew the shell safely and effectively.
Gather The Necessary Tools
Use a Phillips screwdriver that fits the screws well. Avoid using too big or too small screwdrivers. This reduces the risk of slipping and damage.
Locate All Screws On The Outer Shell
Check the drill’s handle, body, and back for screws. Some screws may hide under labels or rubber covers. Remove any covers gently to find all screws.
Unscrew Carefully And Keep Track
Turn each screw counterclockwise to loosen. Do not force screws if stuck. Apply gentle pressure and wiggle if needed. Place all screws in a small container to avoid losing them.
Separating Internal Components
Separating the internal components of a Makita 6095D cordless drill requires care and precision. This step is essential to inspect, clean, or replace parts inside the drill. Understanding how to remove and handle each component helps avoid damage and keeps the tool working well.
Motor Removal
Start by locating the motor inside the drill casing. Carefully disconnect any wires connected to the motor. Use a screwdriver to remove screws holding the motor in place. Gently pull the motor out, avoiding any force that might break parts. Keep the motor on a clean surface for inspection.
Gearbox Access
The gearbox controls the drill’s speed and torque. After removing the motor, find the gearbox housing. Unscrew the housing carefully to expose the gears inside. Take note of gear placement for easy reassembly. Remove the gears slowly to prevent losing small parts.
Trigger And Switch Assembly
The trigger and switch control the power flow to the motor. Locate the trigger assembly by opening the drill handle. Disconnect the wires attached to the switch. Unscrew the trigger to free it from the casing. Check the switch for any signs of wear or damage.
Inspecting Parts For Damage
Inspecting parts for damage is a key step after disassembling the Makita 6095D cordless drill. It helps find worn or broken components early. This prevents bigger issues and keeps the drill working well.
Focus on each part carefully. Look for cracks, wear, or dirt. Cleaning parts before inspection can show hidden damage clearly. Use good light and a magnifier if needed.
Checking The Chuck
The chuck holds drill bits tightly. Check for cracks or chips on its surface. Make sure it opens and closes smoothly. Any stiffness or damage means it needs repair or replacement.
Inspecting The Motor Brushes
Motor brushes wear down over time. Check their length and condition. If brushes are too short or cracked, replace them. Worn brushes cause poor drill performance.
Examining The Battery Contacts
Battery contacts must be clean and free of corrosion. Look for rust or dirt on the metal parts. Dirty contacts can stop the drill from getting power. Clean gently with a dry cloth.
Looking Over The Gearbox
The gearbox transfers power from the motor to the chuck. Check gears for wear or broken teeth. Grease should be present but not dirty. Damaged gears cause noise and reduce power.
Reviewing The Trigger And Switch
Test the trigger and switch for smooth action. Look for cracks or stuck parts. Faulty switches can prevent the drill from turning on. Replace damaged parts for safety and function.

Credit: forum.toolsinaction.com
Cleaning And Maintenance Tips
Cleaning and maintaining your Makita 6095D cordless drill keeps it working well. Dirt and dust can block parts and slow the drill down. Regular care helps the drill last longer and perform better.
Simple cleaning steps prevent damage and avoid costly repairs. Keeping the drill clean also makes it safer to use. Follow these easy tips to care for your drill after disassembly.
Cleaning The Chuck And Bit Holder
Remove all bits from the chuck. Use a soft brush to clear dirt and dust. Wipe the chuck with a dry cloth. Avoid using water or oil inside the chuck. This keeps the chuck turning smoothly.
Lubricating Moving Parts
Apply light machine oil to the drill’s moving parts. Focus on the gears and trigger mechanism. Use oil sparingly to avoid attracting dust. Lubrication reduces wear and helps parts move freely.
Checking And Cleaning The Battery Contacts
Remove the battery from the drill. Inspect contacts for dirt or corrosion. Clean contacts gently with a dry cloth or fine sandpaper. Good contact ensures the drill gets full power from the battery.
Cleaning The Drill Housing
Wipe the drill’s outside with a damp cloth. Avoid harsh chemicals that can damage plastic parts. Use a soft brush to clean vents and cooling slots. Clean housing helps keep internal parts cool.
Storing The Drill Properly
Store the drill in a dry place away from dust. Keep the battery separate if not used for a long time. Proper storage protects the drill and extends its life.
Reassembling The Drill
Reassembling the Makita 6095D cordless drill requires patience and attention to detail. Each part must fit perfectly for the drill to work well. Take your time to put all components back in the right order.
Start by gathering all screws and small parts in one place. This keeps everything organized and easy to find. Follow the steps below to make the process smooth and safe.
Step 1: Reinstall The Motor And Gear Assembly
Place the motor back into the housing carefully. Align it so the gears fit together without forcing. Make sure the wires do not get pinched or tangled.
Step 2: Secure The Trigger And Switch Mechanism
Put the trigger and switch components in their slots. Check that the trigger moves freely and the switch clicks properly. Tighten the screws gently to avoid damage.
Step 3: Attach The Battery Connector
Reconnect the battery terminals carefully. Ensure the contacts are clean and fit snugly. This step is crucial for the drill to power on correctly.
Step 4: Close The Drill Housing
Align both halves of the drill casing. Press them together firmly but without forcing. Insert and tighten all casing screws evenly.
Step 5: Test The Drill
Insert the battery and switch the drill on. Listen for unusual sounds and check the rotation. A smooth operation means the reassembly is successful.

Credit: www.laptopbatteryexpress.com
Credit: www.shareyourrepair.com
Frequently Asked Questions
How Do I Safely Disassemble A Makita 6095d Drill?
First, remove the battery for safety. Use the correct screwdriver to unscrew all visible screws. Keep parts organized. Avoid forcing components apart to prevent damage.
What Tools Are Needed To Disassemble Makita 6095d?
You’ll need a Phillips screwdriver, a flathead screwdriver, and a small wrench. Having a magnetic tray for screws helps. Avoid using power tools to prevent stripping screws.
Can I Replace The Motor After Disassembling The Drill?
Yes, once disassembled, you can access and replace the motor. Ensure you get the correct motor model. Reassemble carefully to maintain drill performance.
How Do I Clean Internal Parts During Disassembly?
Use compressed air to blow out dust and debris. Wipe parts gently with a dry cloth. Avoid using water or solvents that may damage electronics.
Conclusion
Disassembling the Makita 6095D cordless drill is simpler than it seems. Take your time and follow each step carefully. Keep track of all parts to avoid confusion later. Use the right tools to make the process easier and safer. Regular cleaning and checking can extend your drill’s life.
Now, you can fix or maintain your drill yourself. A little patience goes a long way. Try it out and see how much you learn.