
Are you tired of hunting for your cordless drill charger every time you need it? Imagine having a neat, organized spot where your drill and all its batteries are always ready to go.
Building your own cordless drill charging station is easier than you think, and it can save you time and frustration. In this guide, you’ll discover simple steps to create a charging station that fits your tools and workspace perfectly. Keep reading to find out how you can take control of your tool charging and make your projects smoother and more efficient.
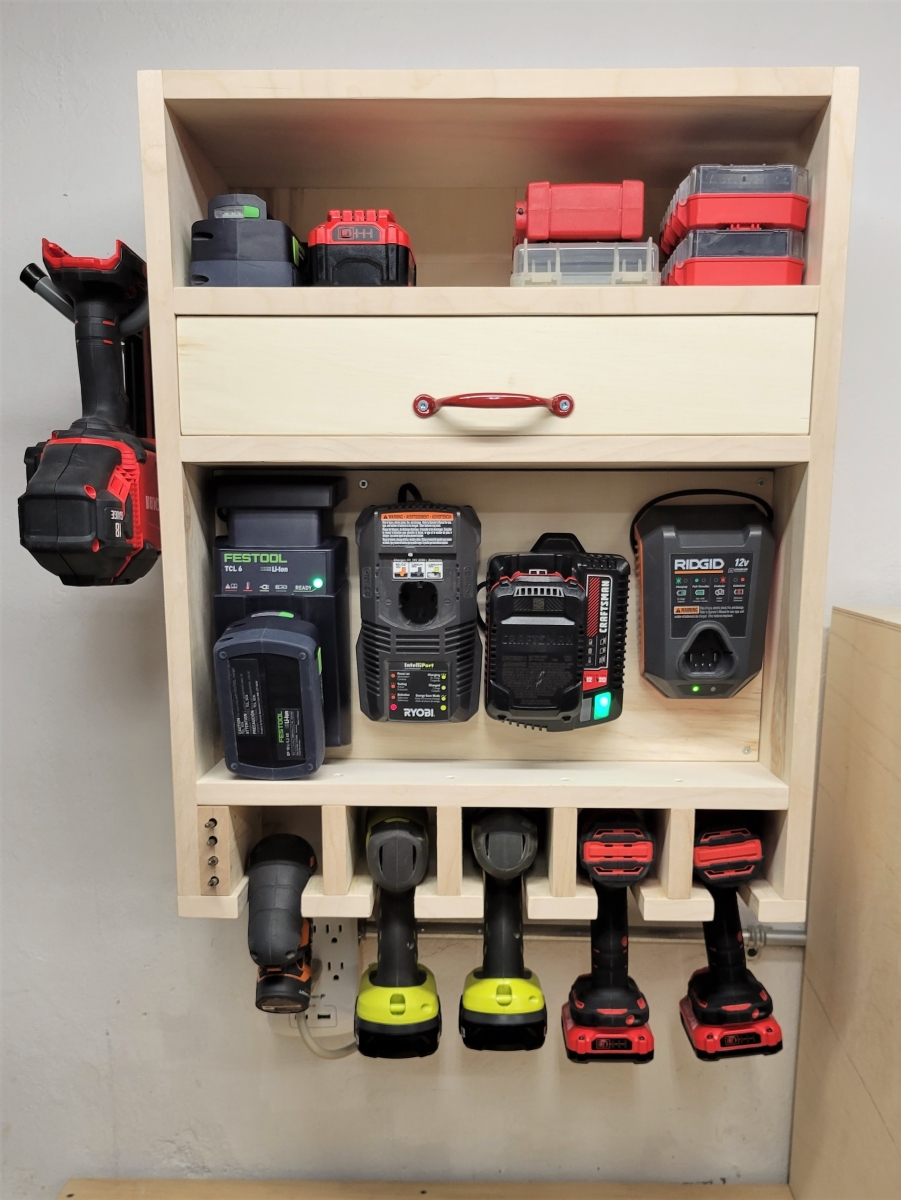
Materials Needed
Building a cordless drill charging station requires gathering specific materials. These materials ensure your station is sturdy, organized, and safe. Collecting everything before starting saves time and avoids interruptions. The right tools and supplies make the process easier and faster.
Tools And Supplies
You will need a few basic tools for this project. A drill, screwdriver, and measuring tape are essential. Sandpaper helps smooth wooden surfaces. A saw is useful if you need to cut wood pieces to size. For supplies, gather wood boards, screws, and brackets. Electrical tape and cable organizers keep cords neat. A power strip or multiple outlet extension is necessary for charging.
Choosing The Right Components
Select durable wood like plywood or MDF for the station base. Choose screws and brackets that fit the wood thickness. Use a power strip with enough outlets for all chargers. Pick cable organizers that match your cord thickness. Ensure the charging station size fits your drill and batteries. Safety matters, so avoid flammable materials near chargers.
Credit: www.ukraine-canoe.org
Designing Your Station
Building a cordless drill charging station starts with good design. A well-planned station keeps your drills organized and ready to use. It saves time and space.
Designing your station means thinking about where to place it and how to keep it safe. Careful planning makes the charging station efficient and durable.
Space And Layout Planning
Choose a spot with enough room for your drills and chargers. A small shelf or a corner of the workbench can work well. Make sure there is space for air to circulate around the chargers.
Place chargers close to power outlets to avoid long cords. Keep drills easy to reach. Arrange the station so you can see all tools at a glance. This saves time and prevents clutter.
Safety Considerations
Safety is very important when designing a charging station. Avoid placing the station near water or in damp areas. Keep cords neat and out of walkways to prevent trips.
Use a sturdy surface that will not tip over. Make sure chargers have enough space to cool down. Overheating can damage batteries and cause accidents. Regularly check cords and plugs for damage.
Building The Base
Building the base is the first step in creating a cordless drill charging station. A strong base keeps your station stable. It holds the drill and charger safely. The base should be sturdy and fit your workspace. Choosing the right materials and assembling them carefully sets the foundation for the entire project.
Take time to prepare the base well. This makes charging and storing your drill easier and safer.
Selecting The Base Material
Choose a material that is strong and easy to work with. Wood is a popular choice. It is affordable and simple to cut. Plywood or MDF boards work well. Avoid thin or weak materials. They can break or bend under weight.
Plastic or metal bases can also work but need special tools to cut. Wood is best for beginners. It gives a stable surface and holds screws tightly.
Cutting And Assembly
Measure the size of your drill and charger first. Mark the base material with a pencil. Use a saw to cut the wood to the right size. Smooth the edges with sandpaper to avoid splinters.
Join the pieces using wood glue and screws. Make sure the base is flat and level. Let the glue dry before adding more parts. Check the base for stability. A solid base makes the whole station last longer.

Credit: www.woodsmithplans.com
Installing Charging Slots
Installing charging slots is an important step in building a cordless drill charging station. It keeps chargers organized and easy to access. Proper installation makes charging faster and safer.
Take time to plan the slots carefully. Each slot should fit the drill charger perfectly. This helps avoid damage and clutter.
Measuring For Drill Placement
Start by measuring the size of each drill charger. Use a ruler or tape measure for accuracy. Note the length, width, and height of each charger. Also, check the space needed for the drill to fit comfortably in the slot.
Mark these measurements on the board or wall where you will install the slots. Leave some extra space to make it easy to place and remove the drills. Proper measurements prevent tight spots and make the station user-friendly.
Securing Chargers
Choose screws or brackets that match the weight of your chargers. Secure each charger firmly in its slot. This stops chargers from falling or moving during use.
Check that the chargers are stable and easy to plug into the power source. Make sure wires are neat and do not block access. A well-secured charger improves safety and convenience in your workspace.
Wiring And Power Setup
Setting up the wiring and power for your cordless drill charging station is key. It ensures your drill charges safely and efficiently. Proper wiring prevents damage to your tools and keeps your workspace tidy. This section covers organizing cables and making sure electrical connections are secure.
Organizing Cables
Keep cables neat to avoid tangles and hazards. Use cable ties or clips to bundle wires together. Label each cable for easy identification. Place cables away from sharp edges or moving parts. Proper cable management improves safety and makes your station look clean.
Ensuring Proper Electrical Connections
Check all connections before plugging in your charger. Use insulated connectors to avoid shocks. Match the charger’s voltage with your power source. Secure wires tightly to prevent loose contacts. Test the setup with a multimeter to confirm correct voltage and current flow.

Credit: www.instructables.com
Finishing Touches
Finishing touches make your cordless drill charging station neat and safe. These small steps help keep everything in order and protect your tools. A well-finished station looks professional and lasts longer.
Labeling And Organization
Label each charging spot clearly. Use simple words or icons. This helps you find the right drill or battery fast. Organize cables to avoid tangles. Use clips or ties to keep wires neat. A tidy station saves time and frustration.
Adding Protective Elements
Add soft padding under chargers to prevent scratches. Use rubber feet to stop slipping on smooth surfaces. Cover sharp edges with tape or foam for safety. Protect your tools from dust by adding a clear cover or box. These steps keep your charging station safe and durable.
Maintenance Tips
Maintaining your cordless drill charging station keeps it working well for a long time. Regular care helps avoid problems and ensures safety. Small efforts in upkeep save time and money later.
Cleaning And Upkeep
Keep the charging station free from dust and dirt. Use a dry cloth to wipe the surface often. Avoid wet cloths or sprays near electrical parts. Check for any loose wires or broken parts. Tighten screws and fix damages quickly. Store the station in a dry place to stop rust or corrosion. Clean the drill battery contacts with a soft cloth. Good cleaning helps the battery charge well and last longer.
Troubleshooting Common Issues
Check the power source if the charger does not work. Make sure the plug is fully inserted and the outlet has power. Look for damaged cords or connectors. Replace any worn or broken parts immediately. If the battery won’t charge, try a different battery to test the charger. Overheating can cause charging problems. Let the charger cool before use. Reset the charging station by unplugging it for a few minutes. Simple checks often fix most problems fast.
Frequently Asked Questions
What Materials Are Needed For A Cordless Drill Charging Station?
You need wood or plastic boards, screws, a drill holder, charging ports, and cable organizers. These help create a neat, safe charging station.
How Do I Organize Multiple Drill Batteries Efficiently?
Use labeled compartments or holders for each battery. This keeps them charged, sorted, and easy to find when needed.
Can I Customize The Charging Station For Different Drill Brands?
Yes, customize slots and charging ports to fit various drill sizes and battery types. This ensures compatibility and convenience.
Is It Safe To Build A Cordless Drill Charging Station At Home?
Yes, with proper insulation and secure wiring, it is safe. Follow electrical guidelines to avoid risks and ensure durability.
Conclusion
Building a cordless drill charging station saves time and space. It keeps your tools organized and ready to use. You can charge multiple batteries at once. The process is simple and cost-effective. A tidy workspace helps you work faster and safer.
Try making your own charging station today. Enjoy the ease of having your drills fully charged and close by.