
If you’ve ever struggled to remove a chuck from your cordless drill, you know how frustrating it can be. Whether you need to replace a worn-out chuck or switch to a different type, getting it off can feel tricky without the right steps.
But don’t worry—this guide will walk you through the process in simple, clear steps that anyone can follow. By the end, you’ll have the confidence to handle your drill like a pro and avoid costly mistakes. Ready to make your next drill fix quick and easy?
Let’s get started.
Tools Needed
Removing a chuck from a cordless drill needs some basic tools. These tools make the job easier and safer. Having the right items ready helps you finish faster and avoid damage.
Adjustable Wrench
An adjustable wrench fits different sizes of nuts and bolts. It helps loosen the chuck nut that holds the chuck in place. It is simple to use and easy to adjust.
Allen Wrench (hex Key)
An Allen wrench is a small L-shaped tool. Many cordless drills use a hex screw inside the chuck. This tool helps remove that screw quickly and without slipping.
Screwdriver
A screwdriver may be needed to remove screws on the drill body. Choose a flathead or Phillips head, depending on the screw type. It helps open covers or panels if required.
Hammer Or Mallet
A hammer or rubber mallet helps tap parts gently. It loosens stuck pieces without causing damage. Use it carefully to avoid bending or breaking parts.
Cleaning Cloth
A clean cloth wipes dirt and grease from the drill. It helps you see parts clearly and hold tools better. Clean tools and parts work more smoothly.
Credit: www.ifixit.com
Safety First
Safety must come first before removing a chuck from a cordless drill. Working with power tools can be dangerous without proper care. Taking safety steps helps prevent accidents and injuries.
Always pause and think about safety before starting. Prepare your workspace and tools carefully. Follow simple rules to protect yourself during the process.
Disconnect The Battery
Always remove the drill’s battery before any work. This stops the drill from turning on by mistake. Removing the battery cuts power and lowers risk of injury.
Wear Protective Gear
Put on safety glasses to guard your eyes. Dust and small parts can fly during removal. Gloves protect your hands from sharp edges and slips.
Clear Your Workspace
Work in a clean, well-lit area. Remove clutter that can cause tripping or distraction. A tidy space keeps you focused and safe.
Use Proper Tools
Use the right tools for the job. Wrong tools can slip and cause harm. Check if your wrench or key fits the chuck perfectly.
Identify Your Chuck Type
Removing a chuck from a cordless drill starts with knowing the type of chuck you have. Different chucks require different removal methods. Identifying your chuck type saves time and effort.
Most cordless drills use one of two main chuck types. Each type looks and works differently. Recognizing the type helps you use the right tools and steps.
Keyless Chuck
Keyless chucks tighten and loosen by hand. They have ridges or a textured grip for easy twisting. No extra tools are needed to open or close them. Common in modern cordless drills, keyless chucks allow quick bit changes.
Keyed Chuck
Keyed chucks use a small gear key to tighten or loosen. The key fits into holes on the chuck’s side. Turning the key locks or unlocks the drill bit. These chucks provide a firmer grip but need the key for adjustments.
Inspecting The Chuck
Look closely at the chuck’s design and mechanism. Check if it has a keyhole or just a grip for hand tightening. The presence of holes on the side means it is a keyed chuck. Smooth, hand-tightened grips suggest a keyless chuck.
Prepare The Drill
Preparing the drill is the first step to safely remove the chuck. Proper preparation helps avoid damage and makes the process easier.
Take your time to get the drill ready. Follow these steps carefully before you start removing the chuck.
Power Off And Remove The Battery
Turn off the drill completely. Take out the battery to prevent accidental starts. Safety first.
Clean The Drill Exterior
Wipe dust and debris from the drill’s surface. A clean tool works better and is easier to handle.
Lock The Drill Spindle
Use the spindle lock button to stop the chuck from turning. This keeps the drill steady during removal.
Prepare The Workspace
Clear the area and have tools ready. A neat workspace helps you focus and avoid losing parts.
Loosen The Chuck
Loosening the chuck is the first step to remove it from a cordless drill. The chuck holds the drill bit firmly. It must be loosened carefully to avoid damage. There are two common ways to loosen the chuck. One uses the drill’s keyless mechanism. The other uses a chuck key. Both methods are simple and easy to follow.
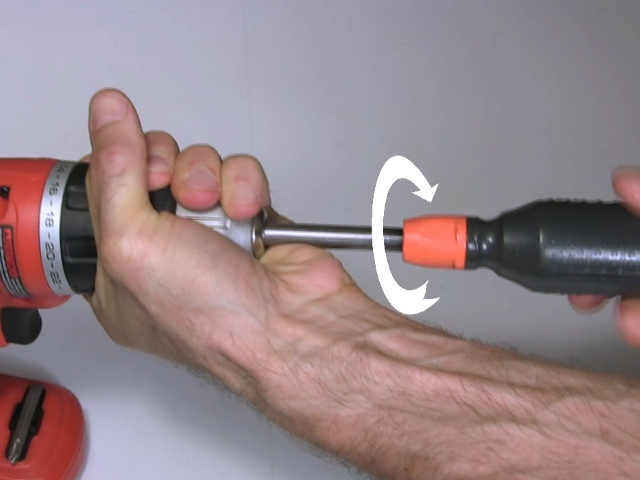
Using The Drill’s Keyless Mechanism
Most modern cordless drills have a keyless chuck. You can loosen it by hand. Hold the drill firmly with one hand. Use your other hand to turn the chuck collar counterclockwise. Turn it until the jaws open enough to remove the bit. You may need to use some force. Once loose, the chuck can be removed or the bit changed quickly.
Using A Chuck Key
Older drills use a chuck key to loosen the chuck. Insert the key into the hole on the chuck. The teeth of the key should fit into the gear teeth of the chuck. Turn the key counterclockwise. This will open the jaws holding the drill bit. Keep turning until the chuck is loose enough. Then, you can remove the chuck or replace the bit easily.
Remove The Chuck
Removing the chuck from a cordless drill is a simple task. It helps to replace or clean the chuck. This section guides you through the easy steps to remove it safely and quickly.
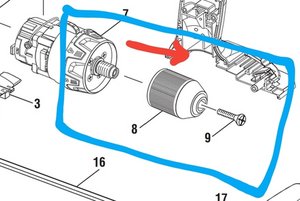
Locate The Retaining Screw
First, find the retaining screw inside the chuck. Open the chuck jaws fully. Look inside the center for a small screw. It holds the chuck in place. Some drills may not have this screw. Check your drill manual if unsure.
Unscrew The Retaining Screw
Use a screwdriver to turn the retaining screw. Turn it counterclockwise to loosen. This screw is usually reverse-threaded. That means turn it clockwise to loosen. Remove the screw completely. Keep it safe for reassembly.
Detach The Chuck
Hold the drill firmly. Grip the chuck with your hand. Turn it counterclockwise to loosen. Use a wrench if it is too tight. Pull the chuck off the drill shaft. Now, the chuck is removed and ready for replacement or cleaning.
Clean And Inspect
Cleaning and inspecting the chuck is a key step after removal. Dirt and debris can build up inside the chuck. This buildup can cause poor performance or damage the drill. Careful cleaning keeps the chuck working smoothly. Inspection helps find any wear or cracks early. This prevents bigger problems later on.
Cleaning The Chuck
Use a small brush to remove dirt from the chuck. A toothbrush works well for this task. Wipe away dust with a dry cloth. Avoid using water to prevent rust. If needed, use a little rubbing alcohol on a cloth. Make sure the chuck is dry before reassembling.
Inspecting For Damage
Look closely at the chuck for cracks or worn parts. Check the jaws inside for bending or chips. Examine the outer shell for dents or scratches. Damaged parts can affect drill accuracy and safety. Replace the chuck if you find serious damage.
Lubricating The Chuck
Apply a small amount of light machine oil to the moving parts. This reduces friction and keeps the chuck turning smoothly. Do not use too much oil; it can attract dirt. Wipe off any excess oil with a clean cloth. Proper lubrication extends the chuck’s life.

Credit: www.youtube.com
Reinstall Or Replace The Chuck
After removing the chuck from your cordless drill, the next step is to either reinstall the same chuck or replace it with a new one. This process is simple and important to ensure the drill works correctly. A properly installed chuck holds drill bits firmly and allows smooth operation.
Choosing to reinstall the old chuck saves money, but only if it is in good condition. A worn or damaged chuck should be replaced to avoid problems during drilling.
How To Reinstall The Chuck
Start by cleaning the drill’s spindle and the chuck. Dirt or dust can stop the chuck from fitting well. Align the chuck with the spindle. Push it firmly onto the spindle until it fits tight. Some chucks need to be screwed on by turning clockwise. Check if your chuck has a threaded hole to screw it in.
How To Replace The Chuck
Buy a new chuck that fits your drill model. Check the size and type before buying. Remove any parts left on the spindle. Attach the new chuck by pushing it onto the spindle or screwing it in. Tighten the chuck using the drill’s key or by hand if it is keyless. Test the chuck by inserting a drill bit and tightening it.
Tips For Secure Chuck Installation
Make sure the chuck is tight and does not wobble. Use the correct tool to tighten the chuck fully. Avoid over-tightening, which can damage the spindle. Test the drill at low speed before using it on a project. A well-installed chuck improves safety and drilling accuracy.
Test The Drill
Testing the drill is a key step after removing the chuck. This check ensures the drill works properly. It also confirms the chuck is fully detached and nothing blocks the drill’s function.
Testing helps find any problems early. It saves time and avoids damage. Always test the drill in a safe place with no objects nearby.
Power On The Drill
First, turn on the drill. Hold it firmly in your hand. Listen for unusual sounds or vibrations. A smooth start means the drill is fine.
Check The Spindle Rotation
Watch the spindle where the chuck was. It should rotate freely and evenly. Any jerking or noise means something is wrong. Stop and inspect again.
Test The Drill With A Bit
Insert a drill bit into the spindle. Tighten it lightly. Turn the drill on and off a few times. This checks if the drill can hold a bit securely without the chuck.
Credit: rimstar.org
Frequently Asked Questions
How Do I Loosen A Stuck Cordless Drill Chuck?
To loosen a stuck chuck, first remove the battery. Hold the drill firmly, then turn the chuck counterclockwise. Use pliers if needed, but avoid excessive force to prevent damage. Applying some penetrating oil can help loosen rust or debris.
What Tools Are Needed To Remove A Drill Chuck?
You typically need an Allen wrench to remove the chuck screw. A pair of pliers or a wrench helps loosen the chuck itself. Some drills may require a special chuck key or spanner for removal.
Can I Remove The Chuck Without A Chuck Key?
Yes, many cordless drills have keyless chucks. You can twist the chuck collar by hand to loosen and remove it. If it’s tight, use a cloth for grip or pliers carefully to avoid damage.
How Do I Remove The Chuck Screw Safely?
First, remove the battery to avoid accidental starts. Use an Allen wrench to unscrew the chuck screw, turning it clockwise (righty-tighty, lefty-loosey does not apply here). This screw holds the chuck in place and must be removed to detach the chuck.
Conclusion
Removing a chuck from a cordless drill is easier than it seems. Follow the steps carefully and take your time. Use the right tools to avoid damage. Always ensure the drill is off and safe to handle. Practice makes the process quicker and smoother.
Now, you can change or fix parts with confidence. Keep your drill working well by removing the chuck properly. Simple steps lead to better results and longer tool life.